
YOGYUI
힐스테이트 광교산::시스템에어컨 - 애플 홈킷 + 구글 어시스턴트 연동 본문

지난 포스트에서 천장 시스템에어컨 관련 RS-485 패킷 후킹 및 분석을 완료했다 (링크)
마찬가지로 파이썬에서 MQTT 메시지를 핸들링하는 코드를 구현하고, Homebridge 및 Home Assistant 액세서리를 추가하도록 하자
1. python 코드 작성
깃헙 저장소 hillstate-airconditioner 브랜치로 소스코드 커밋 완료
https://github.com/YOGYUI/HomeNetwork/tree/hillstate-airconditioner
GitHub - YOGYUI/HomeNetwork: HomeNetwork(Homebridge) Repo
HomeNetwork(Homebridge) Repo. Contribute to YOGYUI/HomeNetwork development by creating an account on GitHub.
github.com
에어컨은 가동상태/풍량/현재온도/희망온도/운전모드 총 5개의 상태값이 있어서 홈네트워크 플랫폼과 연동하는게 약간 까다로웠다
일단 시리얼 패킷 파서는 직관적으로 구현했다 (메서드 한 블록이 너무 라인이 길어져서 디바이스별로 메서드를 구분하기 시작했다 ㅎㅎ... 진작 이렇게 할걸)
class ParserVarious(SerialParser):
    def interpretPacket(self, packet: bytearray):
        try:
            if packet[3] == 0x1B:  # 가스차단기
                self.handleGasValve(packet)
            elif packet[3] == 0x18:  # 난방
                self.handleThermostat(packet)
            elif packet[3] == 0x2B:  # 환기 (전열교환기)
                self.handleVentilator(packet)
            elif packet[3] == 0x1C:  # 시스템에어컨
                self.handleAirconditioner(packet)
            else:
                if packet[4] == 0x02:
                    print(self.prettifyPacket(packet))
        except Exception as e:
            writeLog('interpretPacket::Exception::{} ({})'.format(e, packet), self)

    def handleAirconditioner(self, packet: bytearray):
        room_idx = packet[6] >> 4
        if packet[4] == 0x04:  # 상태 응답
            state = 0 if packet[8] == 0x02 else 1
            temp_current = packet[9]  # 현재 온도
            temp_config = packet[10]  # 설정 온도
            mode = packet[11]  # 모드 (0=자동, 1=냉방, 2=제습, 3=공기청정)
            rotation_speed = packet[12]  # 풍량 (1=자동, 2=미풍, 3=약풍, 4=강풍)
            result = {
                'device': 'airconditioner',
                'room_index': room_idx,
                'state': state,
                'temp_current': temp_current,
                'temp_config': temp_config,
                'mode': mode,
                'rotation_speed': rotation_speed
            }
            self.sig_parse_result.emit(result)
Homebridge mqttthing 플러그인의 액세서리 중 온도조절과 풍량조절이 함께 존재하는 액세서리는 'Heater Cooler'밖에 없어 보여서 급한대로(?) 이녀석으로 선택!
Active 항목은 boolean으로 기기 동작 중 상태를 나타내며, state(상태) 항목은 INACTIVE, IDLE, HEATING, COOLING 4단계로 구분되어 있는데, 사용자가 원하는 상태만 지정할 수 있다 (나는 INACTIVE, COOLING만 선택)
나머지 rotation speed나 target temperature 등은 기존의 thermostat, fan 항목을 써본 적이 있으므로 거의 그대로 사용해도 된다

heater-cooler 액세서리 형식에 맞게 mqtt 메시지를 발행할 수 있도록 Airconditioner 객체를 다음과 같이 구현해줬다
class AirConditioner(Device):
    temp_current: int = 0  # 현재 온도
    temp_current_prev: int = 0  # 현재 온도 버퍼
    temp_config: int = 0  # 냉방 설정 온도
    temp_config_prev: int = 0  # 냉방 설정 온도 버퍼
    temp_range: List[int]  # 설정 가능한 온도값의 범위
    mode: int = -1  # 운전모드
    mode_prev: int = -1  # 운전모드 버퍼
    rotation_speed: int = -1  # 풍량
    rotation_speed_prev: int = -1  # 풍량 버퍼

    def __init__(self, name: str = 'AirConditioner', **kwargs):
        super().__init__(name, **kwargs)
        self.temp_range = [0, 100]

    def __repr__(self):
        repr_txt = f'<{self.name}({self.__class__.__name__} at {hex(id(self))})'
        repr_txt += f' Room Idx: {self.room_index}'
        repr_txt += '>'
        return repr_txt

    def publish_mqtt(self):
        # https://ddhometech.wordpress.com/2021/01/03/ha-mqtt-hvac-integration-using-tasmota-ir-bridge/
        if self.state:
            state = 'COOLING'
        else:
            state = 'INACTIVE'
        obj = {
            "active": self.state,
            "state": state,
            "currentTemperature": self.temp_current,
            "targetTemperature": self.temp_config
        }
        if self.rotation_speed == 0x02:  # 미풍
            obj['rotationspeed'] = 50
            obj['rotationspeed_name'] = 'Min'
        elif self.rotation_speed == 0x03:  # 약풍
            obj['rotationspeed'] = 75
            obj['rotationspeed_name'] = 'Medium'
        elif self.rotation_speed == 0x04:  # 강풍
            obj['rotationspeed'] = 100
            obj['rotationspeed_name'] = 'Max'
        else:
            obj['rotationspeed'] = 25
            obj['rotationspeed_name'] = 'Auto'
        if self.mqtt_client is not None:
            self.mqtt_client.publish(self.mqtt_publish_topic, json.dumps(obj), 1)

    def setTemperatureRange(self, range_min: int, range_max: int):
        self.temp_range[0] = range_min
        self.temp_range[1] = range_max
        self.temp_current = max(range_min, min(range_max, self.temp_current))
        self.temp_config = max(range_min, min(range_max, self.temp_config))

    def setState(self, state: int, **kwargs):
        self.state = state
        if not self.init:
            self.publish_mqtt()
            self.init = True
        if self.state != self.state_prev:
            self.publish_mqtt()
        self.state_prev = self.state
        # 현재온도
        temp_current = kwargs.get('temp_current')
        if temp_current is not None:
            self.temp_current = temp_current
            if self.temp_current != self.temp_current_prev:
                self.publish_mqtt()
            self.temp_current_prev = self.temp_current
        # 희망온도
        temp_config = kwargs.get('temp_config')
        if temp_config is not None:
            self.temp_config = temp_config
            if self.temp_config != self.temp_config_prev:
                self.publish_mqtt()
            self.temp_config_prev = self.temp_config
        # 모드
        # 0=자동, 1=냉방, 2=제습, 3=공기청정
        mode = kwargs.get('mode')
        if mode is not None:
            self.mode = mode
            if self.mode != self.mode_prev:
                self.publish_mqtt()
            self.mode_prev = self.mode
        # 풍량
        # 1=자동, 2=미풍, 3=약풍, 4=강풍
        rotation_speed = kwargs.get('rotation_speed')
        if rotation_speed is not None:
            self.rotation_speed = rotation_speed
            if self.rotation_speed != self.rotation_speed_prev:
                self.publish_mqtt()
            self.rotation_speed_prev = self.rotation_speed

    def makePacketSetState(self, state: bool):
        # F7 0B 01 1C 02 40 XX YY 00 ZZ EE
        # XX: 상위 4비트=공간 인덱스, 하위 4비트=1
        # YY: 0x01=On, 0x02=Off
        # ZZ: Checksum (XOR SUM)
        packet = bytearray([0xF7, 0x0B, 0x01, 0x1C, 0x02, 0x40])
        packet.append((self.room_index << 4) + 0x01)
        if state:
            packet.extend([0x01, 0x00])
        else:
            packet.extend([0x02, 0x00])
        packet.append(self.calcXORChecksum(packet))
        packet.append(0xEE)
        return packet

    def makePacketSetTemperature(self, temperature: int):
        # F7 0B 01 1C 02 45 XX YY 00 ZZ EE
        # XX: 상위 4비트=공간 인덱스, 하위 4비트=1
        # YY: 온도 설정값
        # ZZ: Checksum (XOR SUM)
        packet = bytearray([0xF7, 0x0B, 0x01, 0x1C, 0x02, 0x45])
        packet.append((self.room_index << 4) + 0x01)
        packet.extend([temperature & 0xFF, 0x00])
        packet.append(self.calcXORChecksum(packet))
        packet.append(0xEE)
        return packet

    def makePacketSetRotationSpeed(self, rotation_speed: int):
        # F7 0B 01 1C 02 5D XX YY 00 ZZ EE
        # XX: 상위 4비트=공간 인덱스, 하위 4비트=1
        # YY: 0x01=자동, 0x02=미풍, 0x03=약풍, 0x04=강풍
        # ZZ: Checksum (XOR SUM)
        packet = bytearray([0xF7, 0x0B, 0x01, 0x1C, 0x02, 0x5D])
        packet.append((self.room_index << 4) + 0x01)
        packet.extend([rotation_speed & 0xFF, 0x00])
        packet.append(self.calcXORChecksum(packet))
        packet.append(0xEE)
        return packet

    def makePacketSetMode(self, mode: int):
        # F7 0B 01 1C 02 5C XX YY 00 ZZ EE
        # XX: 상위 4비트=공간 인덱스, 하위 4비트=1
        # YY: 0x0=자동, 0x01=냉방, 0x03=제습, 0x04=공기청정
        # ZZ: Checksum (XOR SUM)
        packet = bytearray([0xF7, 0x0B, 0x01, 0x1C, 0x02, 0x5C])
        packet.append((self.room_index << 4) + 0x01)
        packet.extend([mode & 0xFF, 0x00])
        packet.append(self.calcXORChecksum(packet))
        packet.append(0xEE)
        return packet
에어컨의 풍량은 자동, 미풍, 약풍, 강풍 4단계가 있는데 이를 각각 25%, 50%, 75%, 100% 풍량에 매칭해줬다
(애플 홈킷은 풍량을 수치형 100%로밖에 설정할 수 없는게 약간 아쉽다.. 다른 방식이 있을래나?)
※ 홈브릿지 액세서리 템플릿은 깃헙 저장소에 자세히 나와있다
반면, Home Assistant는 에어컨에 딱 매칭할 수 있는 액세서리가 있다! (climate)
fan_modes로 4단계 풍량을 지정해줄 수 있다 (꽤나 훌륭하구만?)
climate:
  - platform: mqtt
    name: "거실 에어컨"
    unique_id: "livingroom_airconditioner"
    modes:
      - "off"
      - "cool"
    fan_modes:
      - "Max"
      - "Medium"
      - "Min"
      - "Auto"
    mode_state_topic: "home/hillstate/airconditioner/state/1"
    mode_state_template: '{% if value_json.active %} cool {% else %} off {% endif %}'
    mode_command_topic: "home/hillstate/airconditioner/command/1"
    mode_command_template: >-
      {% set values = {'off': 0, 'cool': 1} %}
      { "active": {{ values[value] if value in values.keys() else 0 }} }
    temperature_state_topic: "home/hillstate/airconditioner/state/1"
    temperature_state_template: "{{ value_json.targetTemperature }}"
    temperature_command_topic: "home/hillstate/airconditioner/command/1"
    temperature_command_template: '{ "targetTemperature": {{ value }} }'
    current_temperature_topic: "home/hillstate/airconditioner/state/1"
    current_temperature_template: "{{ value_json.currentTemperature }}"
    fan_mode_command_topic: "home/hillstate/airconditioner/command/1"
    fan_mode_command_template: '{ "rotationspeed_name": "{{ value }}" }'
    fan_mode_state_topic: "home/hillstate/airconditioner/state/1"
    fan_mode_state_template: "{{ value_json.rotationspeed_name }}"
    min_temp: 18
    max_temp: 30
    precision: 1
MQTT 수신 메시지 핸들링 구문이나 큐 쓰레드는 첨부하기에는 글이 좀 지저분해질 것 같아서 생략~
2. Homebridge, Home Assistant 액세서리 추가
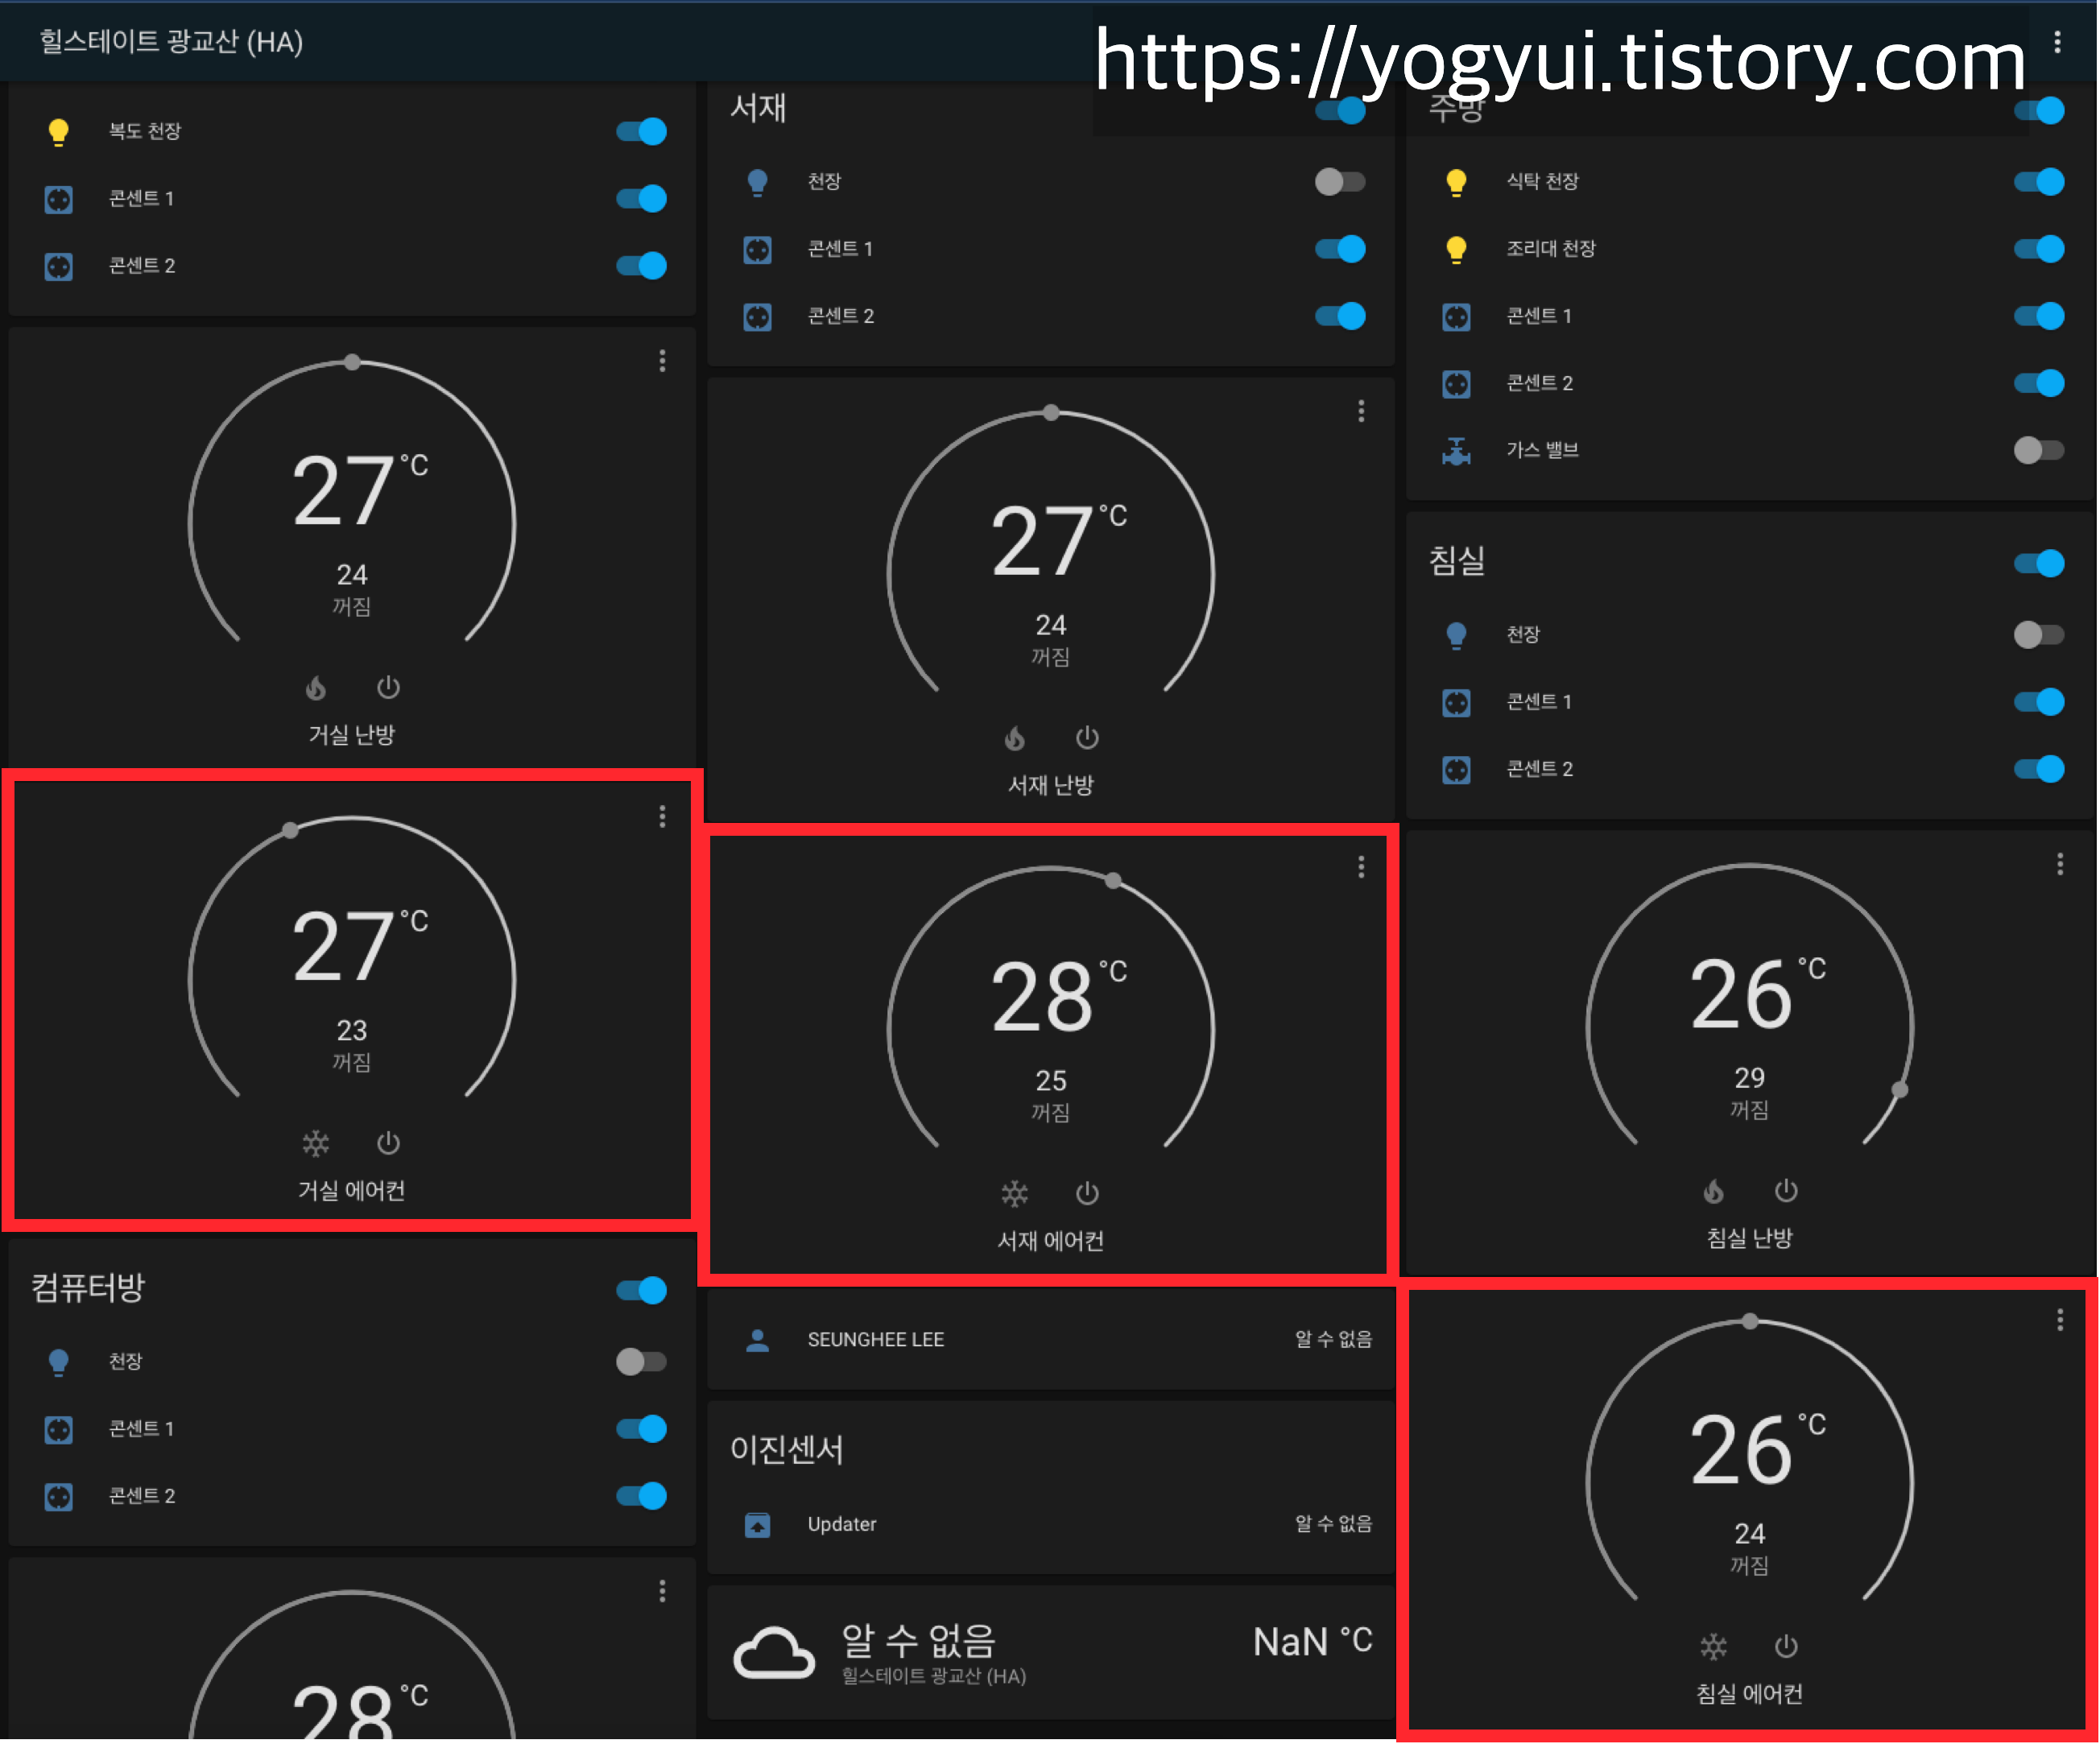
HA 대시보드에서 에어컨 아이템을 선택하면 '송풍 모드'에서 4단계 풍량을 설정할 수 있다 (GOOD!)

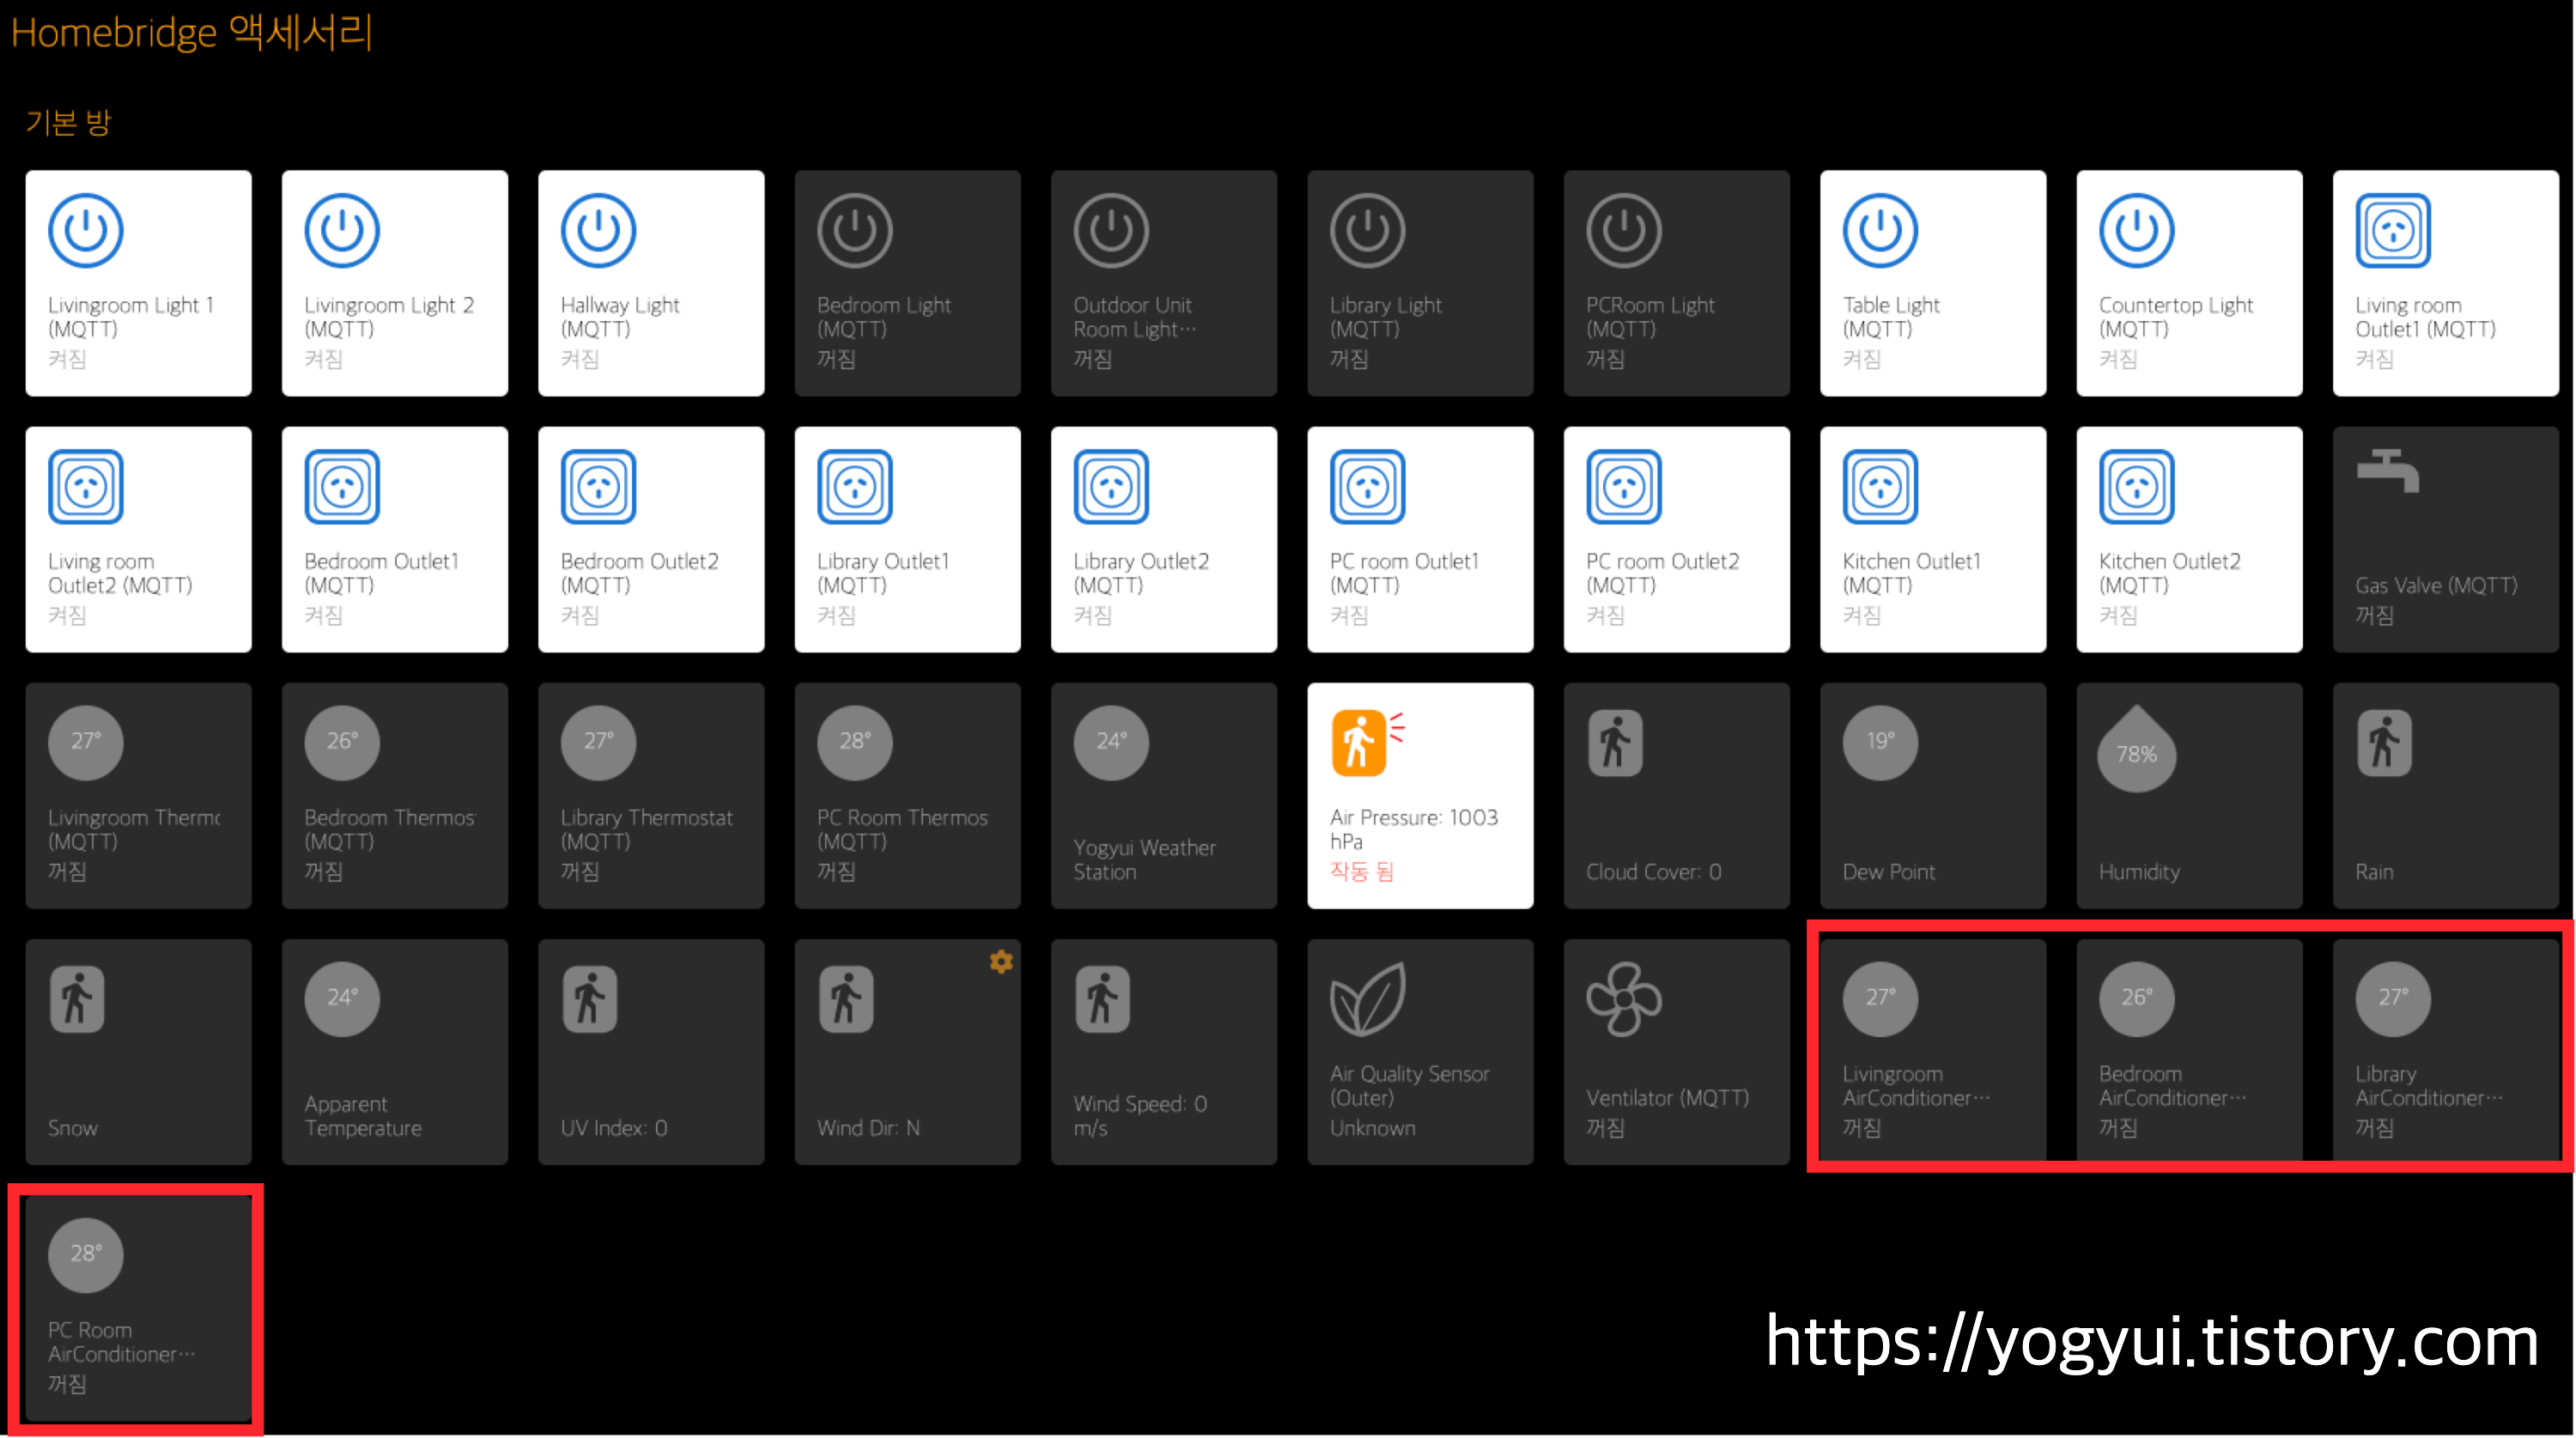
Homebridge, Home Assistant 모두 월패드 관련 아이템만으로 그득하게 대시보드를 채워버렸다 ㅎㅎ
제어할 수 있는 기기가 많다는건 그만큼 스마트한 라이프가 가능하다는 것 아닐까!
3. 작동 테스트
가스차단기, 난방, 전열교환기와 마찬가지로 모바일 기기에서 바꾼 상태가 월패드 UI에서 변경될 때까지는 레이턴시가 있다
(이거 해결할 수 있는 방법도 있을 것 같은데... 맨땅에 헤딩 한번 해봐야겠다)
반면 월패드에서 바꾼 상태는 모바일 기기에 거의 실시간으로 반영된다
HA랑 연동했으므로 구글 홈 미니 AI 스피커랑도 당연히 연동된다 (목소리 주의)
애플 Siri랑도 연동되므로, 애플워치에서 목소리로 제어할 수도 있다
아직은 장마 시즌이라 더위가 심하진 않은데, 7월 넘어가서 본격적으로 무더위가 시작되면 에어컨 가동할 일이 많아질듯~
집에 도착하기 10~20분전에 스마트폰 혹은 스마트워치로 미리 에어컨을 켜고 희망온도를 맞춰놓을 수 있는 쾌적한 삶이 가능하다 ^^ (에어컨은 전기세때문에 굳이 자동화에 추가할 생각은 없다..)

[TODO]
조명 On/Off아울렛(전원 콘센트) On/Off - 실시간 전력량 조회는 불가능도시가스 차단난방 제어 (On/Off, 희망 온도 설정, 현재 방 온도 가져오기)환기 (전열교환기)시스템 에어컨 (냉방 및 공기청정)- 엘리베이터 호출
- 도어락 해제
- Optional: 현관 비디오폰 영상, 거실 천장 모션 센서
'홈네트워크(IoT) > 힐스테이트 광교산' 카테고리의 다른 글
| 힐스테이트 광교산::엘리베이터 - 애플 홈킷 + 구글 어시스턴트 연동 (0) | 2022.06.24 |
|---|---|
| 힐스테이트 광교산::엘리베이터 호출 제어 RS-485 패킷 분석 (9) | 2022.06.23 |
| 힐스테이트 광교산::시스템에어컨 제어 RS-485 패킷 분석 (0) | 2022.06.19 |
| 힐스테이트 광교산::환기(전열교환기) - 애플 홈킷 + 구글 어시스턴트 연동 (1) | 2022.06.18 |
| 힐스테이트 광교산::환기(전열교환기) 제어 RS-485 패킷 분석 (0) | 2022.06.17 |


