
YOGYUI
Home Assistant - MQTT 액세서리 추가하기 (Bestin 홈네트워크 연동) 본문

내가 구현한 Bentin 홈네트워크 - Homebridge 연동 시스템은 모든 디바이스(액세서리)가 MQTT토픽 발행/구독 메커니즘으로 동작한다
Homebridge와 유사하게 Home Assistant(HA)도 MQTT로 동작하는 디바이스를 손쉽게 추가할 수 있다
모든 작업은 configuration.yaml 설정파일을 수정하는 것이므로, VSCode 등을 통해 외부 기기(랩탑 등)에서 SSH로 접속해 작업하는게 편하다

HA 최초 설정 시에는 설정 파일의 소유자가 root로만 구성되어 있기 때문에 외부에서 수정 후 저장할 수 없으므로 이를 바꿔줘야 한다

sudo chown pi configuration.yaml
sudo chmod g+w configuration.yaml
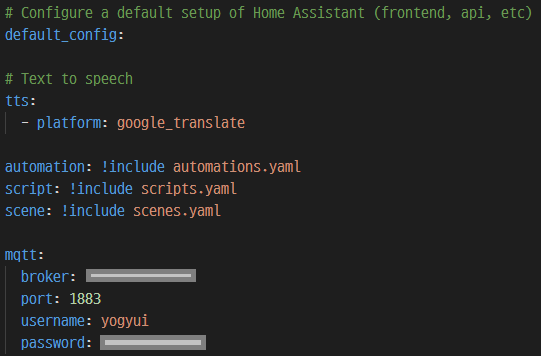
1. MQTT 설정
다음 스크립트를 추가해서 MQTT 브로커 관련 설정을 해주자
mqtt:
  broker: <broker ip address>
  port: <broker port>
  username: <broker auth id>
  password: <broker auth password>
나는 MQTT 브로커로 Mosquitto를 사용했으므로, 관련 정보를 다음과 같이 기입했다
(Mosquitto 관련 정보는 링크, 사용자 계정 관련 정보는 링크 참조)
2. 조명 액세서리 추가하기
조명은 'light' 카테고리로 추가하면 된다
Bestin 홈네트워크 조명은 밝기값이나 RGB 값이 없으므로 다음과 같이 간단하게 작성하면 된다
조명과 관련된 자세한 파라미터는 링크 참고
MQTT Light
Instructions on how to setup MQTT lights using default schema within Home Assistant.
www.home-assistant.io
light:
  - platform: mqtt
    name: "PC Room Light 1"
    schema: template
    state_topic: "home/ipark/light/state/3/0"
    command_topic: "home/ipark/light/command/3/0"
    state_template: "{% if value_json.state %} on {% else %} off {% endif %}"
    command_on_template: '{"state": 1}'
    command_off_template: '{"state": 0}'
    optimistic: false
※ mqtt topic이나 payload 관련해서는 내가 작성한 다른 글들을 참고
MQTT 메시지는 JSON 형식으로 주고받도록 구성했기 때문에, payload 파싱 및 템플릿 구성만 잘 해주면 문제없이 동작한다 (light.mqtt 모듈의 state의 기본 template은 'on', 'off')
Homebridge 액세서리 설정과 비교하면 어떤 느낌인지 확실히 알 수 있다
{
  "accessory": "mqttthing",
  "type": "switch",
  "name": "PC Room Light1 (MQTT)",
  "url": "mosquitto broker url",
  "username": "mosquitto auth id",
  "password": "mosquitto auth password",
  "topics": {
    "getOn": {
      "topic": "home/ipark/light/state/3/0",
      "apply": "return JSON.parse(message).state;"
    },
    "setOn": {
      "topic": "home/ipark/light/command/3/0",
      "apply": "return JSON.stringify({state: message});"
    }
  },
  "integerValue": true,
  "onValue": 1,
  "offValue": 0,
  "history": true,
  "logMqtt": true
}
설정파일 저장 후 HA 재시작 (구성하기 - 설정 - 서버 제어 - 다시 시작하기)

'둘러보기(대시보드)'에 액세서리가 추가된 것을 볼 수 있다
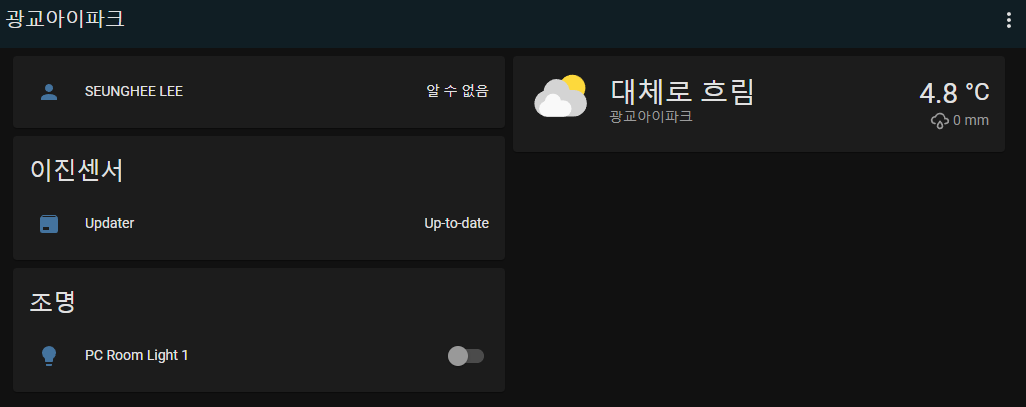
On/Off 제어로 조명이 켜고 꺼지는 지 동작을 확인해보자
이제 조명을 다 추가해주면 된다
조명 설정 스크립트는 아래 접은 글 참고
light:
  - platform: mqtt
    name: "거실 천장 1"
    schema: template
    state_topic: "home/ipark/livingroom/light/state/0"
    command_topic: "home/ipark/livingroom/light/command/0"
    state_template: "{% if value_json.state %} on {% else %} off {% endif %}"
    command_on_template: '{"state": 1}'
    command_off_template: '{"state": 0}'
    optimistic: false
  - platform: mqtt
    name: "거실 천장 2"
    schema: template
    state_topic: "home/ipark/livingroom/light/state/1"
    command_topic: "home/ipark/livingroom/light/command/1"
    state_template: "{% if value_json.state %} on {% else %} off {% endif %}"
    command_on_template: '{"state": 1}'
    command_off_template: '{"state": 0}'
    optimistic: false
  - platform: mqtt
    name: "주방 싱크대"
    schema: template
    state_topic: "home/ipark/light/state/1/0"
    command_topic: "home/ipark/light/command/1/0"
    state_template: "{% if value_json.state %} on {% else %} off {% endif %}"
    command_on_template: '{"state": 1}'
    command_off_template: '{"state": 0}'
    optimistic: false
  - platform: mqtt
    name: "주방 조리대"
    schema: template
    state_topic: "home/ipark/light/state/1/1"
    command_topic: "home/ipark/light/command/1/1"
    state_template: "{% if value_json.state %} on {% else %} off {% endif %}"
    command_on_template: '{"state": 1}'
    command_off_template: '{"state": 0}'
    optimistic: false
  - platform: mqtt
    name: "식탁"
    schema: template
    state_topic: "home/ipark/light/state/1/2"
    command_topic: "home/ipark/light/command/1/2"
    state_template: "{% if value_json.state %} on {% else %} off {% endif %}"
    command_on_template: '{"state": 1}'
    command_off_template: '{"state": 0}'
    optimistic: false
  - platform: mqtt
    name: "서재"
    schema: template
    state_topic: "home/ipark/light/state/1/3"
    command_topic: "home/ipark/light/command/1/3"
    state_template: "{% if value_json.state %} on {% else %} off {% endif %}"
    command_on_template: '{"state": 1}'
    command_off_template: '{"state": 0}'
    optimistic: false
  - platform: mqtt
    name: "침실 천장 1"
    schema: template
    state_topic: "home/ipark/light/state/2/0"
    command_topic: "home/ipark/light/command/2/0"
    state_template: "{% if value_json.state %} on {% else %} off {% endif %}"
    command_on_template: '{"state": 1}'
    command_off_template: '{"state": 0}'
    optimistic: false
  - platform: mqtt
    name: "침실 천장 2"
    schema: template
    state_topic: "home/ipark/light/state/2/1"
    command_topic: "home/ipark/light/command/2/1"
    state_template: "{% if value_json.state %} on {% else %} off {% endif %}"
    command_on_template: '{"state": 1}'
    command_off_template: '{"state": 0}'
    optimistic: false
  - platform: mqtt
    name: "컴퓨터방 천장 1"
    schema: template
    state_topic: "home/ipark/light/state/3/0"
    command_topic: "home/ipark/light/command/3/0"
    state_template: "{% if value_json.state %} on {% else %} off {% endif %}"
    command_on_template: '{"state": 1}'
    command_off_template: '{"state": 0}'
    optimistic: false
  - platform: mqtt
    name: "컴퓨터방 천장 2"
    schema: template
    state_topic: "home/ipark/light/state/3/1"
    command_topic: "home/ipark/light/command/3/1"
    state_template: "{% if value_json.state %} on {% else %} off {% endif %}"
    command_on_template: '{"state": 1}'
    command_off_template: '{"state": 0}'
    optimistic: false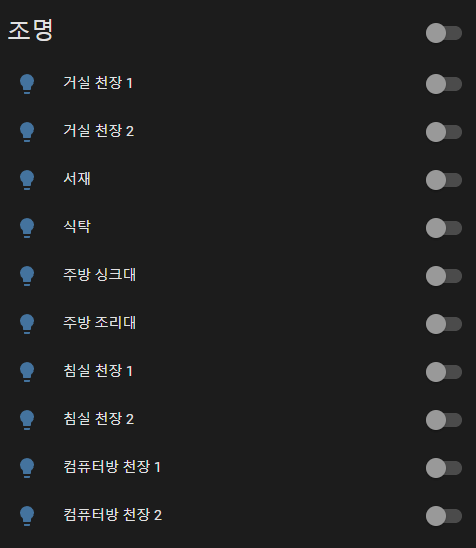
3. 난방 액세서리 추가하기
난방은 HVAC(Heating, Ventilation & Air Conditioning, 공기조화시스템) 모듈을 사용하면 된다
MQTT HVAC 자세한 설정법은 링크 참고
MQTT HVAC
Instructions on how to integrate MQTT HVAC into Home Assistant.
www.home-assistant.io
HVAC 모듈은 Homebridge mqtt의 thermostat 모듈과 마찬가지로 On/Off, 온도설정, 현재온도 3개 기능을 설정해줘야 한다
액세서리 카테고리는 "climate"
climate:
- platform: mqtt
name: "컴퓨터방 난방"
modes:
- "off"
- "heat"
mode_state_topic: "home/ipark/thermostat/state/3"
mode_state_template: "{{ value_json.state.lower() }}"
mode_command_topic: "home/ipark/thermostat/command/3"
mode_command_template: >-
{% set values = {'off': '"OFF"', 'heat': '"HEAT"'} %}
{ "state": {{ values[value] if value in values.keys() else "OFF" }} }
temperature_state_topic: "home/ipark/thermostat/state/3"
temperature_state_template: "{{ value_json.targetTemperature }}"
temperature_command_topic: "home/ipark/thermostat/command/3"
temperature_command_template: '{ "targetTemperature": {{ value }} }'
current_temperature_topic: "home/ipark/thermostat/state/3"
current_temperature_template: "{{ value_json.currentTemperature }}"
min_temp: 5
max_temp: 40
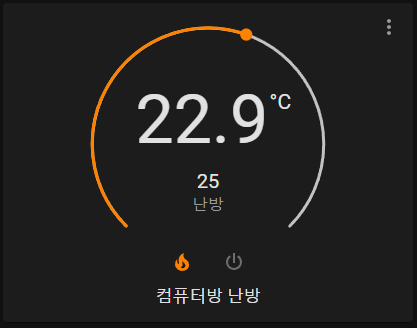
precision: 0.1HA를 재시작하면 대시보드에서 난방 아이템을 볼 수 있다

거실과 침실의 난방 아이템도 동일하게 추가해주면 된다
climate:
  - platform: mqtt
    name: "거실 난방"
    modes:
      - "off"
      - "heat"
    mode_state_topic: "home/ipark/thermostat/state/1"
    mode_state_template: "{{ value_json.state.lower() }}"
    mode_command_topic: "home/ipark/thermostat/command/1"
    mode_command_template: >-
      {% set values = {'off': '"OFF"', 'heat': '"HEAT"'} %}
      { "state": {{ values[value] if value in values.keys() else "OFF" }} }
    temperature_state_topic: "home/ipark/thermostat/state/1"
    temperature_state_template: "{{ value_json.targetTemperature }}"
    temperature_command_topic: "home/ipark/thermostat/command/1"
    temperature_command_template: '{ "targetTemperature": {{ value }} }'
    current_temperature_topic: "home/ipark/thermostat/state/1"
    current_temperature_template: "{{ value_json.currentTemperature }}"
    min_temp: 5
    max_temp: 40
    precision: 0.1
  - platform: mqtt
    name: "침실 난방"
    modes:
      - "off"
      - "heat"
    mode_state_topic: "home/ipark/thermostat/state/2"
    mode_state_template: "{{ value_json.state.lower() }}"
    mode_command_topic: "home/ipark/thermostat/command/2"
    mode_command_template: >-
      {% set values = {'off': '"OFF"', 'heat': '"HEAT"'} %}
      { "state": {{ values[value] if value in values.keys() else "OFF" }} }
    temperature_state_topic: "home/ipark/thermostat/state/2"
    temperature_state_template: "{{ value_json.targetTemperature }}"
    temperature_command_topic: "home/ipark/thermostat/command/2"
    temperature_command_template: '{ "targetTemperature": {{ value }} }'
    current_temperature_topic: "home/ipark/thermostat/state/2"
    current_temperature_template: "{{ value_json.currentTemperature }}"
    min_temp: 5
    max_temp: 40
    precision: 0.1
  - platform: mqtt
    name: "컴퓨터방 난방"
    modes:
      - "off"
      - "heat"
    mode_state_topic: "home/ipark/thermostat/state/3"
    mode_state_template: "{{ value_json.state.lower() }}"
    mode_command_topic: "home/ipark/thermostat/command/3"
    mode_command_template: >-
      {% set values = {'off': '"OFF"', 'heat': '"HEAT"'} %}
      { "state": {{ values[value] if value in values.keys() else "OFF" }} }
    temperature_state_topic: "home/ipark/thermostat/state/3"
    temperature_state_template: "{{ value_json.targetTemperature }}"
    temperature_command_topic: "home/ipark/thermostat/command/3"
    temperature_command_template: '{ "targetTemperature": {{ value }} }'
    current_temperature_topic: "home/ipark/thermostat/state/3"
    current_temperature_template: "{{ value_json.currentTemperature }}"
    min_temp: 5
    max_temp: 40
    precision: 0.1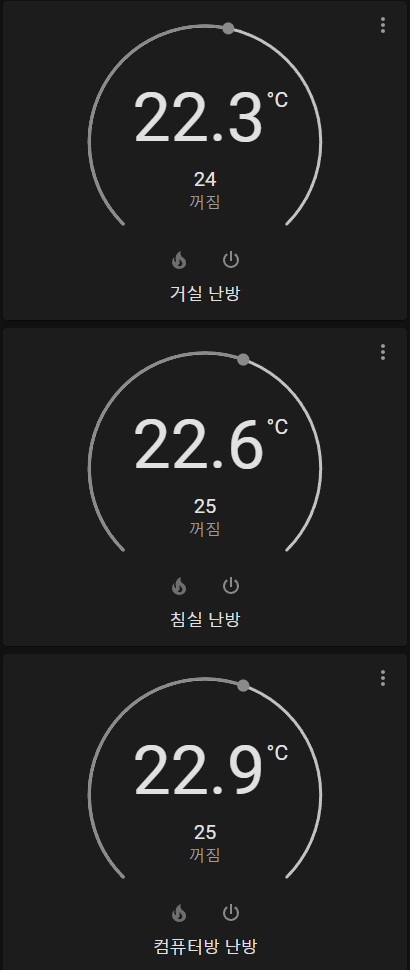
4. 환기(전열교환기) 액세서리 추가하기
환기는 FAN 모듈을 사용하면 된다 (카테고리: fan)
MQTT Fan 모드 링크
MQTT Fan
Instructions on how to integrate MQTT fans into Home Assistant.
www.home-assistant.io
fan:
- platform: mqtt
name: "전열교환기"
state_topic: "home/ipark/ventilator/state"
state_value_template: "{% if value_json.state %} ON {% else %} OFF {% endif %}"
command_topic: "home/ipark/ventilator/command"
command_template: >-
{% set values = {'OFF': 0, 'ON': 1} %}
{ "state": {{ values[value] if value in values.keys() else 0 }} }
percentage_state_topic: "home/ipark/ventilator/state"
percentage_value_template: "{{ value_json.rotationspeed }}"
percentage_command_topic: "home/ipark/ventilator/command"
percentage_command_template: '{ "rotationspeed": {{ value }} }'
speed_range_min: 1
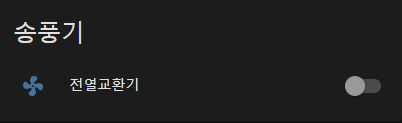
speed_range_max: 100Bestin 전열교환기는 미풍, 약풍, 강풍 3단계밖에 없기 때문에 1 ~ 100 범위의 회전속도를 적절히 3단계로 나누어 파싱하면 된다
재시작하면 대시보드에 '송풍기' 아이템이 나타난다

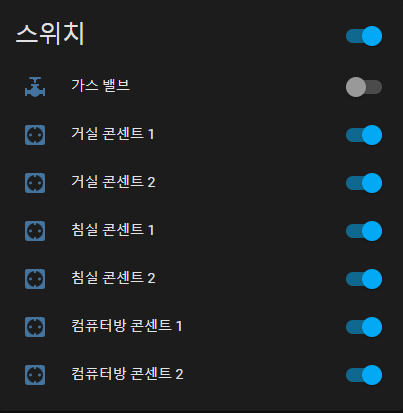
5. 가스 밸브 액세서리 추가하기
가스 밸브는 스위치로 구성하되, 'Turn Off' 기능만 갖고 있으면 된다
카테고리 'switch'로 추가해주자
MQTT Switch 링크
MQTT Switch
Instructions on how to integrate MQTT switches into Home Assistant.
www.home-assistant.io
switch:
- platform: mqtt
name: "가스 밸브"
state_topic: "home/ipark/gasvalve/state"
command_topic: "home/ipark/gasvalve/command"
value_template: '{ "state": {{ value_json.state }} }'
payload_on: '{ "state": 1 }'
payload_off: '{ "state": 0 }'
retain: false
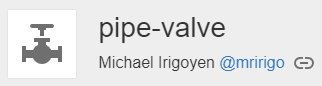
icon: mdi:pipe-valveicon을 mdi에서 가장 가스 밸브처럼 생긴 걸로 가져왔다
HA를 재시작하면 스위치 아이템이 나타난다

6. 엘리베이터 호출 액세서리 추가하기
엘리베이터 호출은 Homebridge와 마찬가지로 버튼 1개(호출) + 감지 센서 1개(도착 알림)로 구성하면 깔끔하다
카테고리는 각각 'button', 'sensor'로 구성하면 된다
MQTT Button 링크
MQTT Button
Instructions on how to integrate MQTT buttons into Home Assistant.
www.home-assistant.io
MQTT Sensor 링크
MQTT Sensor
Instructions on how to integrate MQTT sensors within Home Assistant.
www.home-assistant.io
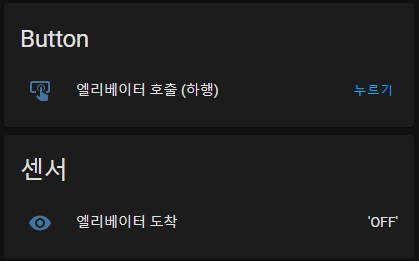
button:
  - platform: mqtt
    name: "엘리베이터 호출 (하행)"
    command_topic: "home/ipark/elevator/command/down"
    command_template: '{ "state": 1 }'
    retain: false

sensor:
  - platform: mqtt
    name: "엘리베이터 도착"
    state_topic: "home/ipark/elevator/state/occupancy"
    value_template: "{% if value_json.state %} 'ON' {% else %} 'OFF' {% endif %}"
HA를 재시작하면 대시보드에 Button과 센서 아이템이 추가된다
7. 전원 콘센트(아울렛) 추가하기
아울렛은 switch와 sensor 조합으로 꾸며주면 된다
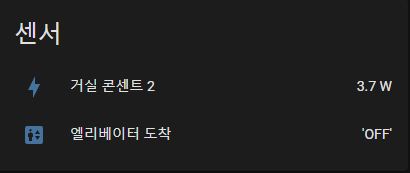
switch:
  - platform: mqtt
    name: "거실 콘센트 2"
    state_topic: "home/ipark/outlet/state/1/1"
    command_topic: "home/ipark/outlet/command/1/1"
    value_template: '{ "state": {{ value_json.state }} }'
    payload_on: '{ "state": 1 }'
    payload_off: '{ "state": 0 }'
    retain: false
    icon: mdi:power-socket-de

sensor:
  - platform: mqtt
    name: "거실 콘센트 2"
    state_topic: "home/ipark/outlet/state/1/1"
    unit_of_measurement: "W"
    value_template: "{{ value_json.watts }}"
    icon: mdi:lightning-bolt
HA를 재시작하면 센서와 스위치에 아울렛 아이템들이 추가된 것을 확인할 수 있다

sensor:
  - platform: mqtt
    name: "거실 콘센트 1"
    state_topic: "home/ipark/outlet/state/1/0"
    unit_of_measurement: "W"
    value_template: "{{ value_json.watts }}"
    icon: mdi:lightning-bolt
  - platform: mqtt
    name: "거실 콘센트 2"
    state_topic: "home/ipark/outlet/state/1/1"
    unit_of_measurement: "W"
    value_template: "{{ value_json.watts }}"
    icon: mdi:lightning-bolt
  - platform: mqtt
    name: "거실 콘센트 3"
    state_topic: "home/ipark/outlet/state/1/2"
    unit_of_measurement: "W"
    value_template: "{{ value_json.watts }}"
    icon: mdi:lightning-bolt
  - platform: mqtt
    name: "침실 콘센트 1"
    state_topic: "home/ipark/outlet/state/2/0"
    unit_of_measurement: "W"
    value_template: "{{ value_json.watts }}"
    icon: mdi:lightning-bolt
  - platform: mqtt
    name: "침실 콘센트 2"
    state_topic: "home/ipark/outlet/state/2/1"
    unit_of_measurement: "W"
    value_template: "{{ value_json.watts }}"
    icon: mdi:lightning-bolt
  - platform: mqtt
    name: "컴퓨터방 콘센트 1"
    state_topic: "home/ipark/outlet/state/3/0"
    unit_of_measurement: "W"
    value_template: "{{ value_json.watts }}"
    icon: mdi:lightning-bolt
  - platform: mqtt
    name: "컴퓨터방 콘센트 2"
    state_topic: "home/ipark/outlet/state/3/1"
    unit_of_measurement: "W"
    value_template: "{{ value_json.watts }}"
    icon: mdi:lightning-bolt

switch:
  - platform: mqtt
    name: "거실 콘센트 1"
    state_topic: "home/ipark/outlet/state/1/0"
    command_topic: "home/ipark/outlet/command/1/0"
    value_template: '{ "state": {{ value_json.state }} }'
    payload_on: '{ "state": 1 }'
    payload_off: '{ "state": 0 }'
    retain: false
    icon: mdi:power-socket-de
  - platform: mqtt
    name: "거실 콘센트 2"
    state_topic: "home/ipark/outlet/state/1/1"
    command_topic: "home/ipark/outlet/command/1/1"
    value_template: '{ "state": {{ value_json.state }} }'
    payload_on: '{ "state": 1 }'
    payload_off: '{ "state": 0 }'
    retain: false
    icon: mdi:power-socket-de
  - platform: mqtt
    name: "침실 콘센트 1"
    state_topic: "home/ipark/outlet/state/2/0"
    command_topic: "home/ipark/outlet/command/2/0"
    value_template: '{ "state": {{ value_json.state }} }'
    payload_on: '{ "state": 1 }'
    payload_off: '{ "state": 0 }'
    retain: false
    icon: mdi:power-socket-de
  - platform: mqtt
    name: "침실 콘센트 2"
    state_topic: "home/ipark/outlet/state/2/1"
    command_topic: "home/ipark/outlet/command/2/1"
    value_template: '{ "state": {{ value_json.state }} }'
    payload_on: '{ "state": 1 }'
    payload_off: '{ "state": 0 }'
    retain: false
    icon: mdi:power-socket-de
  - platform: mqtt
    name: "컴퓨터방 콘센트 1"
    state_topic: "home/ipark/outlet/state/3/0"
    command_topic: "home/ipark/outlet/command/3/0"
    value_template: '{ "state": {{ value_json.state }} }'
    payload_on: '{ "state": 1 }'
    payload_off: '{ "state": 0 }'
    retain: false
    icon: mdi:power-socket-de
  - platform: mqtt
    name: "컴퓨터방 콘센트 2"
    state_topic: "home/ipark/outlet/state/3/1"
    command_topic: "home/ipark/outlet/command/3/1"
    value_template: '{ "state": {{ value_json.state }} }'
    payload_on: '{ "state": 1 }'
    payload_off: '{ "state": 0 }'
    retain: false
    icon: mdi:power-socket-de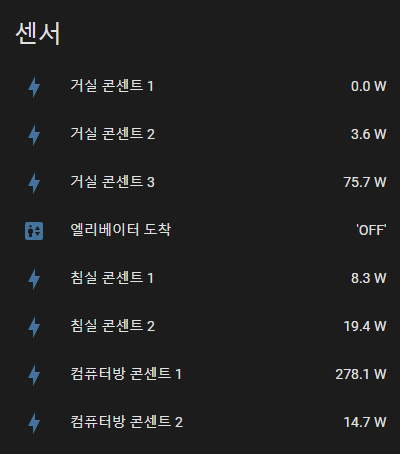
8. 결론
Homebridge MQTT 액세서리에 비해 JSON 파싱하는 구문 작성하는게 너무 번거롭다 ㅠㅠ
(토픽별로 템플릿을 하나하나 정성들여 짜줘야한다...)
사용한 아이템은 light, switch, button, sensor, fan, HVAC 총 6종류이고, 필요에 따라 하나의 디바이스에 두 개의 아이템을 조합해서 구성했다 (ex: 아울렛 = switch + sensor)
아마 HA를 먼저 접했다면 Bestin 홈네트워크 코드를 HA에 맞춰서 작성했을테지만, 소스코드는 왠만하면 건드리기 싫어서 그냥 HA 설정할 때 삽질을 좀 많이 했다
HA를 사용하면서 좀 더 익숙해지면 최적화된 디바이스 구현 방법을 찾아봐야겠다 ^^;
HA랑 Bestin 홈네트워크 디바이스들간의 연동이 끝났으니, 안드로이드 기기와 연동하는 과제만 남았다!
[참고]
'홈네트워크(IoT) > 광교아이파크' 카테고리의 다른 글
| 광교아이파크::Bestin 홈네트워크 - 안드로이드 기기 연동 (Home Assistant + Google Assistant) (0) | 2022.02.20 |
|---|---|
| Bestin 홈네트워크 Flask 웹서버 - Nginx 연동 (0) | 2022.02.19 |
| 광교아이파크::전원콘센트 Apple 홈킷 연동 (3) - Final (4) | 2021.08.23 |
| 광교아이파크::전원콘센트 Apple 홈킷 연동 (2) (0) | 2021.08.23 |
| 광교아이파크::전원콘센트 Apple 홈킷 연동 (1) (2) | 2021.08.23 |


