
YOGYUI
[PROJ] Matter::FanControl 클러스터 개발 예제 (ESP32) 본문

Matter - FanControl Cluster Developing Example using ESP32 SoC
Matter 클러스터 중 하나인 Fan Control 클러스터는 모터(전동기)를 통해 회전하는 팬으로 동작하는 디바이스(선풍기, 서큘레이터, 에어컨, 공기청정기, 환풍기, 주방 후드 등)의 회전 속도 제어를 담당한다
※ 클러스터의 스펙은 다음 글 참고
Matter Specification - Fan Control Cluster
Matter Specification - Fan Control Cluster
Metter :: Fan Control Cluster This cluster specifies an interface to control the speed of a fan. 모터 등으로 회전하는 '팬' 기기의 속도 제어를 위한 클러스터 선풍기, 환풍기, 에어서큘레이터, 에어컨 등 다양한 종류
yogyui.tistory.com
간단하게 Matter Fan Control 클러스터의 동작을 테스트하기 위해 PWM 제어 방식의 DC 모터를 ESP32의 GPIO와 연결해 Matter 펌웨어를 개발한 뒤 테스트해봤다
1. 하드웨어
DC모터 모듈은 수년전에 구입해 잠깐 테스트용으로 사용하고 창고에 박아뒀던 DFRobot의 Gravity 130 DC Motor (DFR0411)를 사용했다 (PWM 제어 방식의 DC 모터라면 어떤 모듈이던지 적용 가능)
https://wiki.dfrobot.com/Gravity__130_DC_Motor_SKU__DFR0411
Gravity__130_DC_Motor_SKU__DFR0411-DFRobot
Gravity__130_DC_Motor_SKU__DFR0411-DFRobot Introduction Gravity 130 DC motor is a very interesting module, the module does not need additional motor driver board, you can use Arduino board to drive it easily. And the speed control could be realized with PW
wiki.dfrobot.com

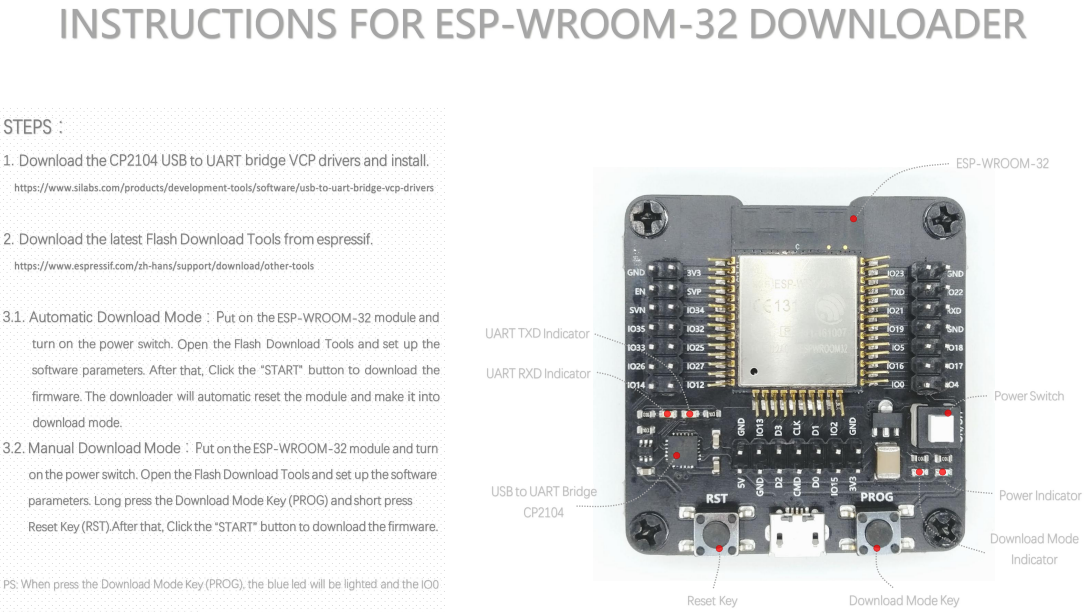
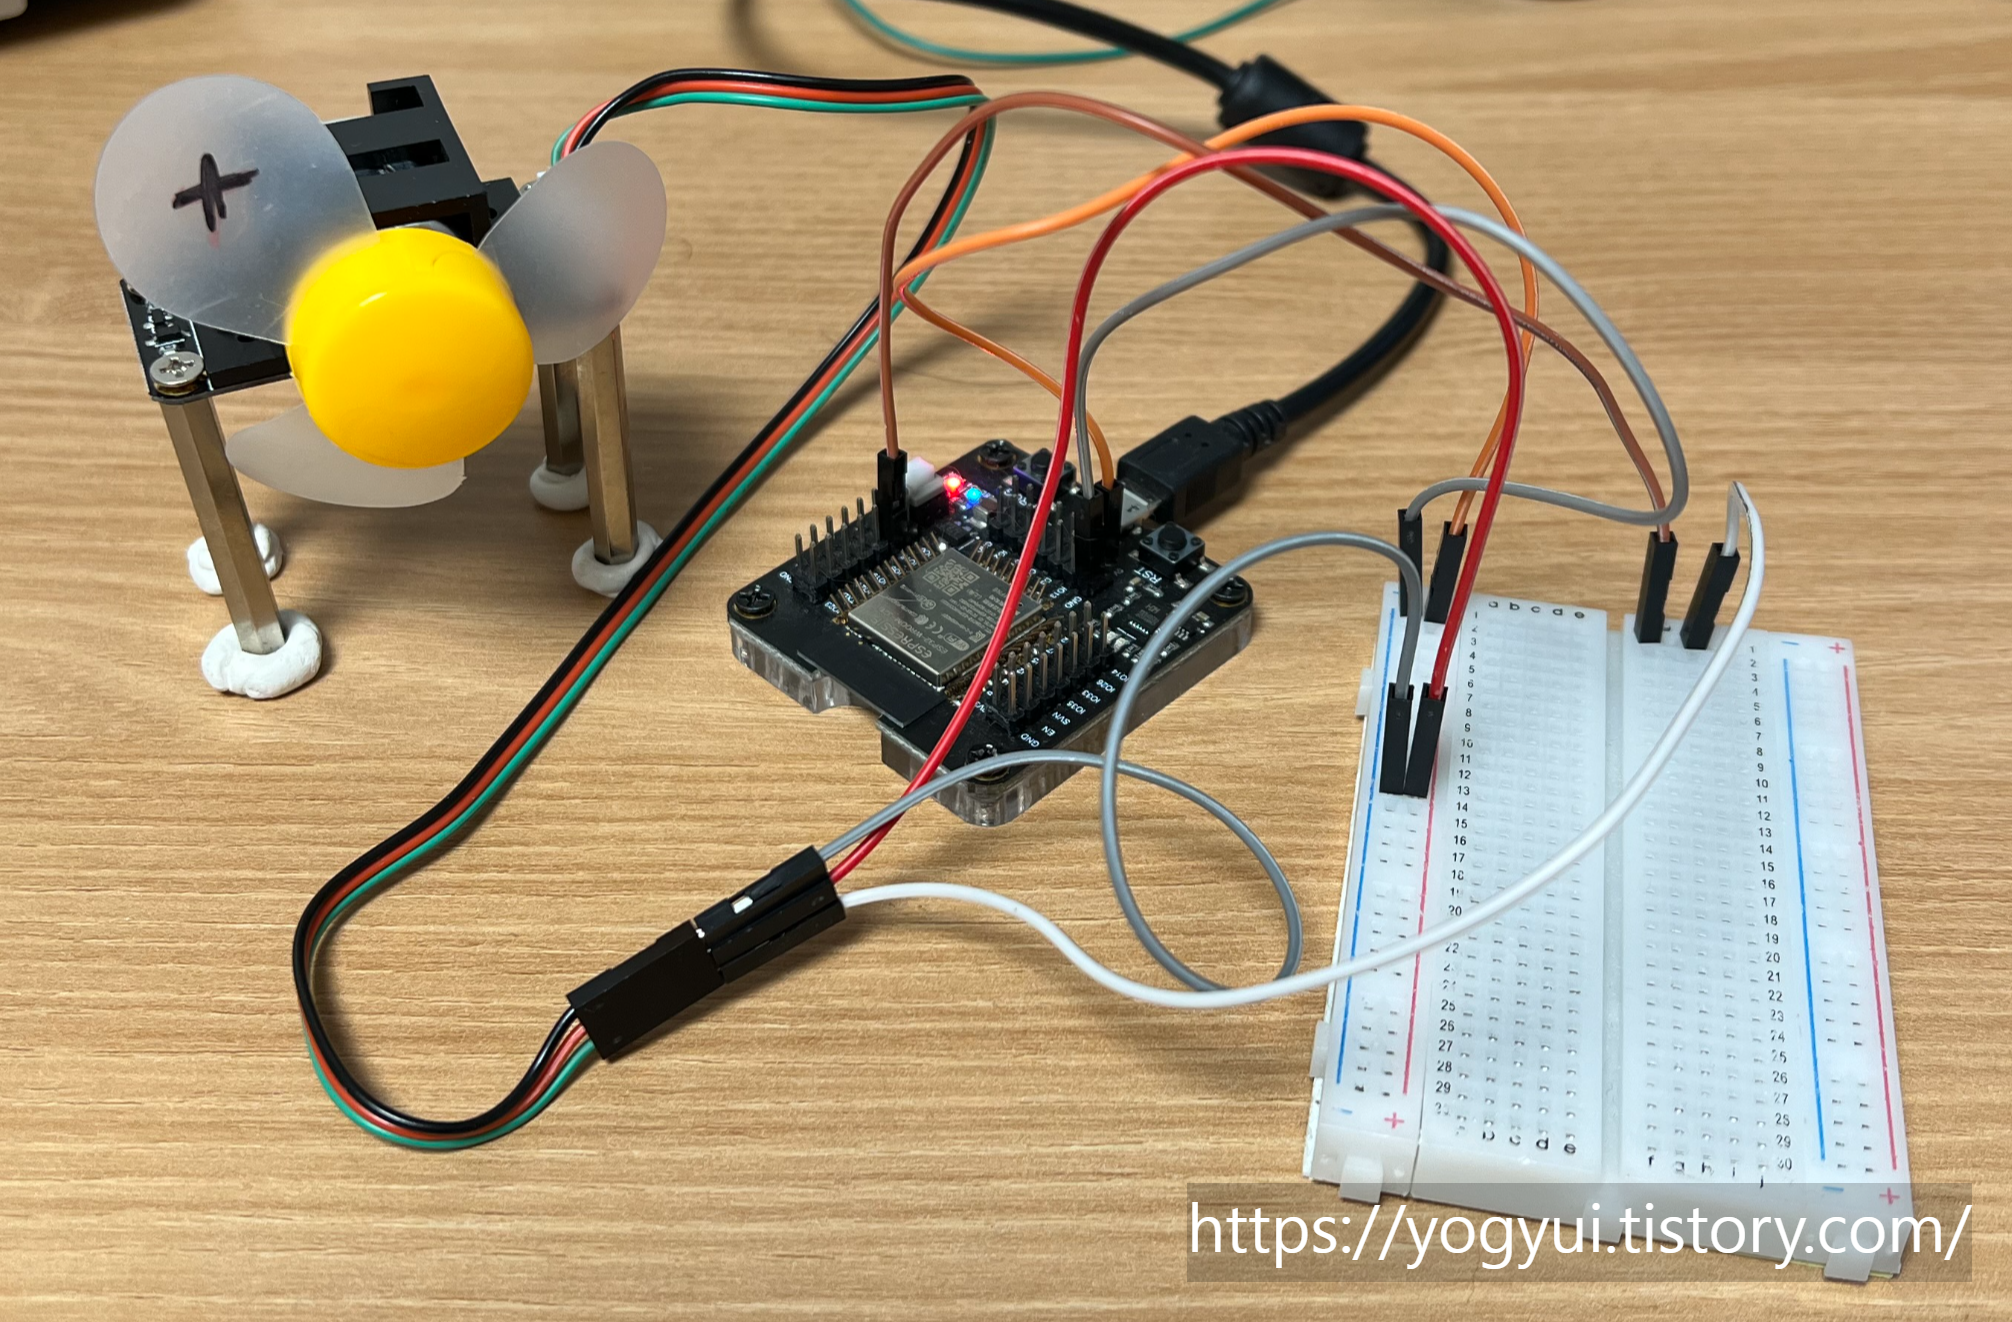
동작 전압 +5V는 XiaoJ사의 ESP32-WROOM-32 Downloader 모듈에서 직접 공급(USB +5V 전압) 받을 수 있다
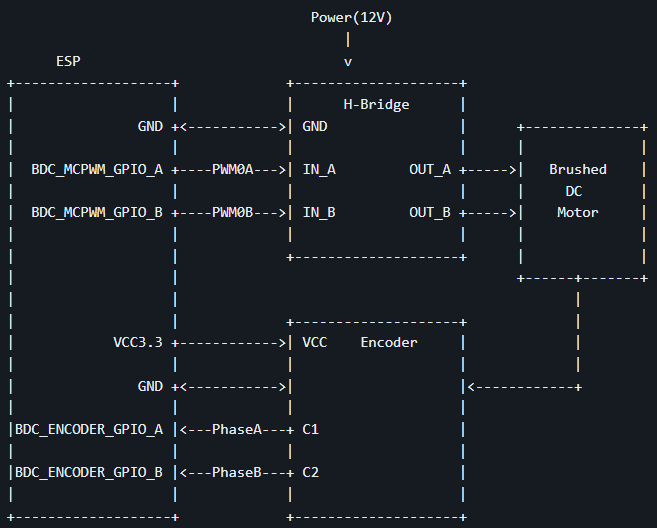
오실로스코프로 PWM 파형을 측정하면서 테스트해보기 위해 아래오 같이 빵판에 결선 (PWM이 지원되는 IO에 연결하면 되며, 나는 GPIO16에 모터의 PWM 라인을 연결했다)
2. Matter 펌웨어 코딩
이번 테스트에 사용한 'ESP32의 Matter 펌웨어 코딩'을 위한 SDK 정보는 아래와 같다
※ Fan Control 클러스터는 매터 1.2부터 정식 지원
- ESP-IDF: v5.1.1-577-g6b1f40b9bf (commit id 6b1f40b9bfb91ec82fab4a60e5bfb4ca0c9b062f)
- ESP-Matter: commit id f3ac7bc893d5acaad5478721a46a97468d23323f
- ConnectedHomeIP: v1.2.0.1 (commit id 181b0cb14ff007ec912f2ba6627e05dfb066c008)
2.1. MCPWM 구현
ESP32 펌웨어 제작 SDK인 ESP-IDF의 MCPWM(Motor Control Pulse Width Modulator) API를 사용하기로 했다
https://docs.espressif.com/projects/esp-idf/en/latest/esp32/api-reference/peripherals/mcpwm.html
Motor Control Pulse Width Modulator (MCPWM) - ESP32 - — ESP-IDF Programming Guide latest documentation
Set dead time for MCPWM generator. Note Due to a hardware limitation, you can’t set rising edge delay for both MCPWM generator 0 and 1 at the same time, otherwise, there will be a conflict inside the dead time module. The same goes for the falling edge s
docs.espressif.com
ESP32의 GPIO핀으로 PWM제어를 구현할 때 row-level PWM(RTOS 태스크 혹은 타이머+카운터+인터럽트 조합), LEDC, MCPWM 등 여러 종류의 API를 사용할 수 있는데, MCPWM은 DC모터, BLDC모터, 서보모터 등 2개 이상의 PWM 채널을 동기화(synchronize)하여 제어할 때 사용하기 좋은 유용한 API다 (서보모터의 엔코더 값도 피드백으로 읽은 뒤 PID 제어 등 closed-loop 제어를 손쉽게 구현할 수도 있다)
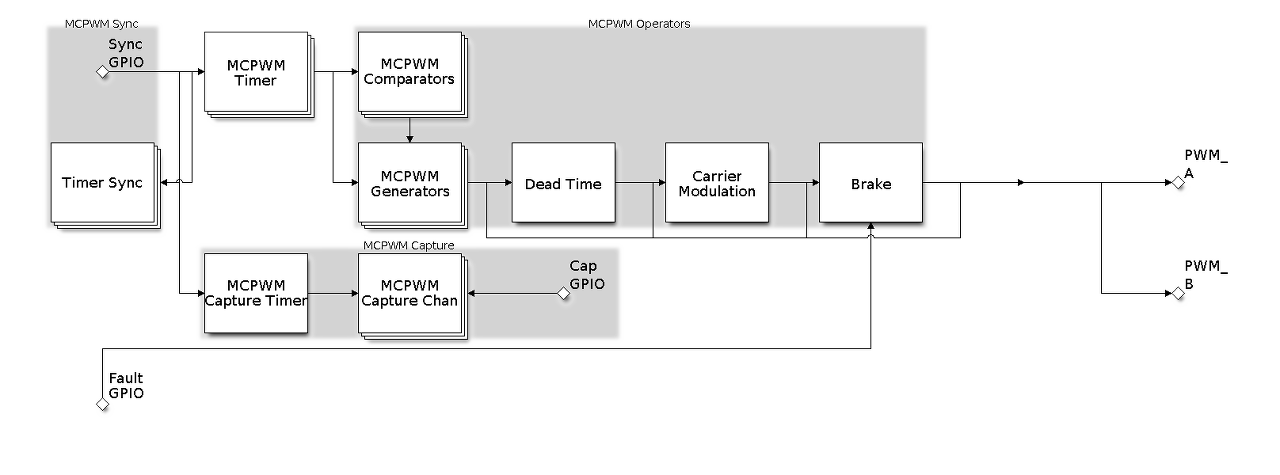
MCPWM은 Timer, Operator, Comparator, Generator 4개의 핵심 submodule과 Fault, Sync, Dead Time, Carrier Modulation, Brake, Capture 등 유틸리티 submodule들을 어떻게 구성하느냐에 따라 다양한 종류의 모터 혹은 전력 변환계를 제어할 수 있는데, 내가 만들 예제에서는 단순히 1채널의 GPIO를 PWM 제어해야 하므로 최대한 간단하게 구현해봤다
(나중에 기회가 되면 MCPWM으로 서보모터나 BLDC모터 제어하는 것도 한번 글로 다뤄봐야겠다)
2.1.1. MCPWM 핸들링 클래스 헤더파일
CMotorPWMDriver 이름의 클래스를 생성한 후, mcpwm의 timer, operator, comparator, generator 4 종류의 핸들을 멤버변수로 갖고 있게 설계한 뒤, public 메서드로 초기화(initialize) 및 PWM 신호의 Duty Ratio(듀티비)를 퍼센트 단위로 입력받게 구현
#include "driver/mcpwm_timer.h"
#include "driver/mcpwm_oper.h"
#include "driver/mcpwm_cmpr.h"
#include "driver/mcpwm_gen.h"

class CMotorPWMDriver
{
public:
    CMotorPWMDriver();
    bool initialize(int gpio_num);
    bool set_enable();
    bool set_disable();
    bool set_duty_ratio(float ratio);

private:
    mcpwm_timer_handle_t m_mcpwm_timer;
    mcpwm_oper_handle_t m_mcpwm_operator;
    mcpwm_cmpr_handle_t m_mcpwm_comparator;
    mcpwm_gen_handle_t m_mcpwm_generator;

    int m_gpio_num;
    uint32_t m_timer_resolution_hz;
    uint32_t m_pwm_frequency_hz;
    uint32_t m_pwm_count_tick;

    bool create_mcpwm_timer();
    bool create_mcpwm_operator();
    bool create_mcpwm_comparator();
    bool create_mcpwm_generator();
};
2.1.2. 클래스 생성자(Constructor) 및 초기화 메서드 구현
CMotorPWMDriver::CMotorPWMDriver()
{
    m_mcpwm_timer = nullptr;
    m_mcpwm_operator = nullptr;
    m_mcpwm_comparator = nullptr;
    m_mcpwm_generator = nullptr;

    m_gpio_num = 0;
    m_group_id = 0;
    m_timer_resolution_hz = 10000000;   // 10MHz
    m_pwm_frequency_hz = 25000;         // 25 KHz (above audible frequency)
    m_pwm_count_tick = 1;
}
DC 모터 PWM 제어 주파수는 사람의 가청주파수(audible frequency, 20 ~ 20kHz)를 벗어나는 범위로 설정해야 모터 동작시 귀에 거슬리는 소음을 방지할 수 있다
나는 PWM 주파수를 25kHz로 설정했고, MCPWM의 타이머 주파수는 넉넉하게 10MHz로 설정했다
(타이머가 1주기당 카운트해야하는 펄스 수는 400 펄스이며, 400펄스 카운트 시 100% duty ratio가 되므로 duty ratio 설정 해상도는 0.25%가 된다)
bool CMotorPWMDriver::initialize(int gpio_num)
{
    m_gpio_num = gpio_num;
    m_pwm_count_tick = m_timer_resolution_hz / m_pwm_frequency_hz;

    if (!create_mcpwm_timer())
        return false;
    if (!create_mcpwm_operator())
        return false;
    if (!create_mcpwm_comparator())
        return false;
    if (!create_mcpwm_generator())
        return false;

    return true;
}
초기화 단계에서는 MCPWM의 timer, operator, comparator, generator 4개 서브모듈을 순서대로 생성해주게 구현
2.1.3. MCPWM Submodule 초기화 메서드 구현
(1) MCPWM Timer 생성
bool CMotorPWMDriver::create_mcpwm_timer()
{
    mcpwm_timer_config_t config;
    config.group_id = 0;                            // Specify from which group to allocate the MCPWM timer
    config.clk_src = MCPWM_TIMER_CLK_SRC_DEFAULT;   // MCPWM timer clock source
    config.resolution_hz = m_timer_resolution_hz;   // Counter resolution in Hz The step size of each count tick equals to (1 / resolution_hz) seconds
    config.count_mode = MCPWM_TIMER_COUNT_MODE_UP;  // Count mode
    config.period_ticks = m_pwm_count_tick;         // Number of count ticks within a period
    config.intr_priority = 0;                       // MCPWM timer interrupt priority,
                                                    // if set to 0, the driver will try to allocate an interrupt with a relative low priority (1,2,3)
    config.flags.update_period_on_empty = false;    // Whether to update period when timer counts to zero
    config.flags.update_period_on_sync = false;     // Whether to update period on sync event

    esp_err_t ret = mcpwm_new_timer(&config, &m_mcpwm_timer);
    return ret == ESP_OK;
}
타이머는 간단하게 틱카운트 주파수, 틱카운트만 설정해주면 된다
(2) MCPWM Operator 생성
bool CMotorPWMDriver::create_mcpwm_operator()
{
    mcpwm_operator_config_t config;
    config.group_id = m_group_id;                   // Specify from which group to allocate the MCPWM operator
    config.intr_priority = 0;                       // MCPWM operator interrupt priority,
                                                    // if set to 0, the driver will try to allocate an interrupt with a relative low priority (1,2,3)
    config.flags.update_gen_action_on_tez = true;   // Whether to update generator action when timer counts to zero
    config.flags.update_gen_action_on_tep = false;  // Whether to update generator action when timer counts to peak
    config.flags.update_gen_action_on_sync = false; // Whether to update generator action on sync event
    config.flags.update_dead_time_on_tez = false;   // Whether to update dead time when timer counts to zero
    config.flags.update_dead_time_on_tep = false;   // Whether to update dead time when timer counts to peak
    config.flags.update_dead_time_on_sync = false;  // Whether to update dead time on sync event

    esp_err_t ret = mcpwm_new_operator(&config, &m_mcpwm_operator);
    if (ret != ESP_OK) {
        return false;
    }
    ret = mcpwm_operator_connect_timer(m_mcpwm_operator, m_mcpwm_timer);
    if (ret != ESP_OK) {
        return false;
    }
    return true;
}
오퍼레이터는 위에서 생성한 MCWPM 타이머의 틱카운트 시작 시점, 종료 시점, Sync 이벤트 시점, Dead Time의 시작/종료/Sync 시점에서의 동작 여부를 설정하면 되며, 나는 단순하게 타이머의 틱카운트가 0가 되는 시점에서만 MCPWM generator가 동작하게 만들었다
※ 생성된 operator는 timer에 연결해줘야 한다
(3) MCPWM Comparator 생성
bool CMotorPWMDriver::create_mcpwm_comparator()
{
    mcpwm_comparator_config_t config;
    config.intr_priority = 0;                   // MCPWM comparator interrupt priority,
                                                // if set to 0, the driver will try to allocate an interrupt with a relative low priority (1,2,3)
    config.flags.update_cmp_on_tez = true;      // Whether to update compare value when timer count equals to zero (tez)
    config.flags.update_cmp_on_tep = false;     // Whether to update compare value when timer count equals to peak (tep)
    config.flags.update_cmp_on_sync = false;    // Whether to update compare value on sync event

    esp_err_t ret = mcpwm_new_comparator(m_mcpwm_operator, &config, &m_mcpwm_comparator);
    if (ret != ESP_OK) {
        return false;
    }

    mcpwm_comparator_set_compare_value(m_mcpwm_comparator, 0);
    return true;
}
comparator(비교기)는 MCPWM 타이머의 틱카운트가 0이 될 때만 값을 비교하게 설정
(4) MCPWM Generator 생성
bool CMotorPWMDriver::create_mcpwm_generator()
{
    mcpwm_generator_config_t config;
    config.gen_gpio_num = m_gpio_num;   // The GPIO number used to output the PWM signal
    config.flags.invert_pwm = false;    // Whether to invert the PWM signal (done by GPIO matrix)
    config.flags.io_loop_back = false;  // For debug/test, the signal output from the GPIO will be fed to the input path as well
    config.flags.io_od_mode = false;    // Configure the GPIO as open-drain mode
    config.flags.pull_up = false;       // Whether to pull up internally
    config.flags.pull_down = true;      // Whether to pull down internally

    esp_err_t ret = mcpwm_new_generator(m_mcpwm_operator, &config, &m_mcpwm_generator);
    if (ret != ESP_OK) {
        GetLogger(eLogType::Error)->Log("Failed to create mcpwm generator (ret: %d)", ret);
        return false;
    }

    mcpwm_generator_set_actions_on_timer_event(
        m_mcpwm_generator,
        MCPWM_GEN_TIMER_EVENT_ACTION(MCPWM_TIMER_DIRECTION_UP, MCPWM_TIMER_EVENT_EMPTY, MCPWM_GEN_ACTION_HIGH),
        MCPWM_GEN_TIMER_EVENT_ACTION_END());
    mcpwm_generator_set_actions_on_compare_event(
        m_mcpwm_generator,
        MCPWM_GEN_COMPARE_EVENT_ACTION(MCPWM_TIMER_DIRECTION_UP, m_mcpwm_comparator, MCPWM_GEN_ACTION_LOW),
        MCPWM_GEN_COMPARE_EVENT_ACTION_END());

    return true;
}
generator는 실제 ESP32의 GPIO를 PWM 파형 출력을 내보내게 설정하는 모듈로, 설정하고자 하는 GPIO 핀번호, PWM 신호 반전 여부, Open-Drain Mode, Pull-Up/Pull-Down 등 신호의 전기적 특성을 설정할 수 있으며, generator 생성 후 여러 타입의 액션(action)을 자유자재로 설정할 수 있다 (이벤트의 상세 설명은 esp-idf 공식 문서 참고)
2.1.4. MCPWM 활성화/비활성화 메서드 구현
bool CMotorPWMDriver::set_enable()
{
    esp_err_t ret = mcpwm_timer_enable(m_mcpwm_timer);
    if (ret != ESP_OK) {
        GetLogger(eLogType::Error)->Log("Failed to enable timer (ret: %d)", ret);
        return false;
    }

    ret = mcpwm_timer_start_stop(m_mcpwm_timer, MCPWM_TIMER_START_NO_STOP);
    if (ret != ESP_OK) {
        GetLogger(eLogType::Error)->Log("Failed to start timer (ret: %d)", ret);
        return false;
    }

    return true;
}

bool CMotorPWMDriver::set_disable()
{
    esp_err_t ret = mcpwm_timer_start_stop(m_mcpwm_timer, MCPWM_TIMER_STOP_EMPTY);
    if (ret != ESP_OK) {
        GetLogger(eLogType::Error)->Log("Failed to stop timer (ret: %d)", ret);
        return false;
    }

    ret = mcpwm_timer_disable(m_mcpwm_timer);
    if (ret != ESP_OK) {
        GetLogger(eLogType::Error)->Log("Failed to disable timer (ret: %d)", ret);
        return false;
    }

    return true;
}
타이머의 시작/종료는 mcpwm_timer_start_stop, mcpwm_timer_enable, mcpwm_timer_disable 함수들을 통해 위와 같이 구현하면 된다
(Matter 연동 시 굳이 disable할 필요없이 off 동작에서는 duty ratio를 0%로 설정하면 된다)
2.1.5. PWM Duty Ratio 변경 메서드 구현
bool CMotorPWMDriver::set_duty_ratio(float ratio)
{
    if (ratio < 0.f)
        ratio = 0.f;
    else if (ratio > 100.f)
        ratio = 100.f;

    uint32_t tick = (uint32_t)((float)m_pwm_count_tick * ratio / 100.f);
    esp_err_t ret = mcpwm_comparator_set_compare_value(m_mcpwm_comparator, tick);
    if (ret != ESP_OK) {
        GetLogger(eLogType::Error)->Log("Failed to comparator set compare value (ret: %d)", ret);
        return false;
    }

    return true;
}
실제 모터의 회전 속도는 PWM 신호의 듀티 비(duty ratio)에 비례하게 되며, Matter에서는 회전 속도를 퍼센트(%) 단위로 조절할 수 있으므로 위와 같이 0~100%에 해당하는 듀티비를 인자로 입력받아 MCPWM comparator의 틱카운트 비교값으로 환산하여 설정하게 구현하면 간단하다
2.2. Matter Endpoint 핸들링 클래스 구현
2.2.1 Endpoint 초기화 구현
Matter 관련 클러스터 핸들링 클래스는 앞서 포스팅했던 OnOff 클러스터 개발 시 구현했던 CDevice 클래스를 상속받는 형태로 계속 개발해나갈 계획
[PROJ] Matter::OnOff 클러스터 개발 예제 (ESP32)
[PROJ] Matter::OnOff 클러스터 개발 예제 (ESP32)
Matter - OnOff Cluster Developing Example using ESP32 SoC 가장 간단한 Matter 클러스터(cluster)인 OnOff 부터 시작해보자 OnOff 타겟은 조명(light)으로 결정했는데, 조명은 일전에 개발해둔 색상 및 밝기 변경이 가능
yogyui.tistory.com
Fan Control 클러스터 관련 클래스는 CDeviceFanControlDCMotor 클래스로 이름을 정했다
#include "device.h"
#include "motorpwmdriver.h"

class CDeviceFanControlDCMotor : public CDevice
{
public:
    CDeviceFanControlDCMotor();
    ~CDeviceFanControlDCMotor();

    bool matter_add_endpoint() override;
    bool matter_init_endpoint() override;
    void matter_on_change_attribute_value(
        esp_matter::attribute::callback_type_t type,
        uint32_t cluster_id,
        uint32_t attribute_id,
        esp_matter_attr_val_t *value
    ) override;
    void matter_update_all_attribute_values() override;

private:
    CMotorPWMDriver *m_motor_pwm_driver;
};
matter_add_endpoint 메서드를 통해 다음과 같이 esp-matter SDK의 API를 사용해 FanControl 클러스터를 가지는 fan 엔드포인트를 추가해준다 (fan 엔드포인트의 디바이스 타입 ID는 0x002B)
bool CDeviceFanControlDCMotor::matter_add_endpoint()
{
    esp_matter::node_t *root = GetSystem()->get_root_node();
    esp_matter::endpoint::fan::config_t config_endpoint;
    config_endpoint.fan_control.fan_mode = 0;

    config_endpoint.fan_control.fan_mode_sequence = 0;
    config_endpoint.fan_control.percent_setting = (uint8_t)0;
    config_endpoint.fan_control.percent_current = 0;
    uint8_t flags = esp_matter::ENDPOINT_FLAG_DESTROYABLE;
    m_endpoint = esp_matter::endpoint::fan::create(root, &config_endpoint, flags, nullptr);
    if (!m_endpoint) {
        GetLogger(eLogType::Error)->Log("Failed to create endpoint");
        return false;
    }

    return CDevice::matter_add_endpoint();
}
어트리뷰트는 FanMode, FanModeSequence, PercentSetting, PercentCurrent가 API를 통해 자동으로 추가되는데, DC 모터 예제에서는 4개 속성만으로도 충분하므로 어트리뷰트 추가나 Feature Map 수정은 하지 않도록 한다
- FanModeSequence 값은 0으로 설정하여 Off/Low/Med/High 4개 모드만 존재하게 만들어준다 (auto mode disable)
2.2.2. Attribute 변경 콜백 핸들링 구현
void CDeviceFanControlDCMotor::matter_on_change_attribute_value(esp_matter::attribute::callback_type_t type, uint32_t cluster_id, uint32_t attribute_id, esp_matter_attr_val_t *value)
{
    if (type == esp_matter::attribute::callback_type_t::PRE_UPDATE) {
        if (cluster_id == chip::app::Clusters::FanControl::Id) {
            if (attribute_id == chip::app::Clusters::FanControl::Attributes::FanMode::Id) {
                GetLogger(eLogType::Info)->Log("cluster: FanControl(0x%04X), attribute: FanMode(0x%04X), value: %u", cluster_id, attribute_id, value->val.u8);
                if (!m_updating_clus_fancontrol_attr_fanmode) {
                    m_state_fan_mode = value->val.u8;
                    switch (m_state_fan_mode) {
                    case FANMODE_LOW:
                        m_motor_pwm_driver->set_duty_ratio((float)PERCENT_MODE_LOW);
                        break;
                    case FANMODE_MEDIUM:
                        m_motor_pwm_driver->set_duty_ratio((float)PERCENT_MODE_MEDIUM);
                        break;
                    case FANMODE_HIGH:
                        m_motor_pwm_driver->set_duty_ratio((float)PERCENT_MODE_HIGH);
                        break;
                    case FANMODE_OFF:
                    default:
                        m_motor_pwm_driver->set_disable();
                        break;
                    }
                } else {
                    m_updating_clus_fancontrol_attr_fanmode = false;
                }
            } else if (attribute_id == chip::app::Clusters::FanControl::Attributes::PercentSetting::Id) {
                GetLogger(eLogType::Info)->Log("cluster: FanControl(0x%04X), attribute: PercentSetting(0x%04X), value: %d", cluster_id, attribute_id, value->val.u8);
                if (!m_updating_clus_fancontrol_attr_percentsetting) {
                    m_state_fan_percent = value->val.u8;
                    m_motor_pwm_driver->set_duty_ratio((float)m_state_fan_percent);
                } else {
                    m_updating_clus_fancontrol_attr_percentsetting = false;
                }
            }
        }
    }
}
Matter 서버로부터 어트리뷰트 값 변경 명령에 대한 콜백은 위와 같이 FanMode, PercentSetting에 대한 처리 구문만 구현해주면 되며, PercentSetting은 0~100 사이로 들어오는 퍼센트 단위의 값을 MCWPM의 duty ratio변경 메서드로 다이렉트로 전달해주면 된다 (FanMode의 경우 Off/Low/Med/High에 대한 각각의 duty ratio를 사전에 설정한 뒤, 이에 맞게 duty ratio 변경 메서드로 전달)
2.3. GitHub 저장소 생성 및 커밋
언제나 그렇든 예제 코드는 깃허브에 저장소를 마련해 커밋해뒀다
전체 코드는 아래 링크에서 확인 가능하다
https://github.com/YOGYUI/matter-esp32-dcmotor
GitHub - YOGYUI/matter-esp32-dcmotor
Contribute to YOGYUI/matter-esp32-dcmotor development by creating an account on GitHub.
github.com
3. DEMO
3.1. Google Home 기기 등록 및 회전 속도 제어
가장 간단하게 스마트기기에서의 제어를 테스트하기 위해 Google Home 개발자 콘솔에서 Matter integration을 하나 추가해줬다 (Vendor ID 0xFFF2, Product ID 0x8004로 ESP32의 nvs 파티션에 factory 정보를 담아뒀다)

Factory 파티션 생성 시 esp-matter의 mfg_tool.py로 생성한 QRCode로 스마트기기에서 Matter 기기 등록을 해주면 된다
관련 글: Matter - Google Home 개발 프로젝트 생성하기

기기 등록 후 'YOGYUI-MATTER-FAN' 이름을 가진 액세서리가 추가된 것을 확인할 수 있다
※ 기기 이름은 Endpoint 0인 Root Node의 Basic Information 클러스터의 Node Label 어트리뷰트값을 변경하면 된다
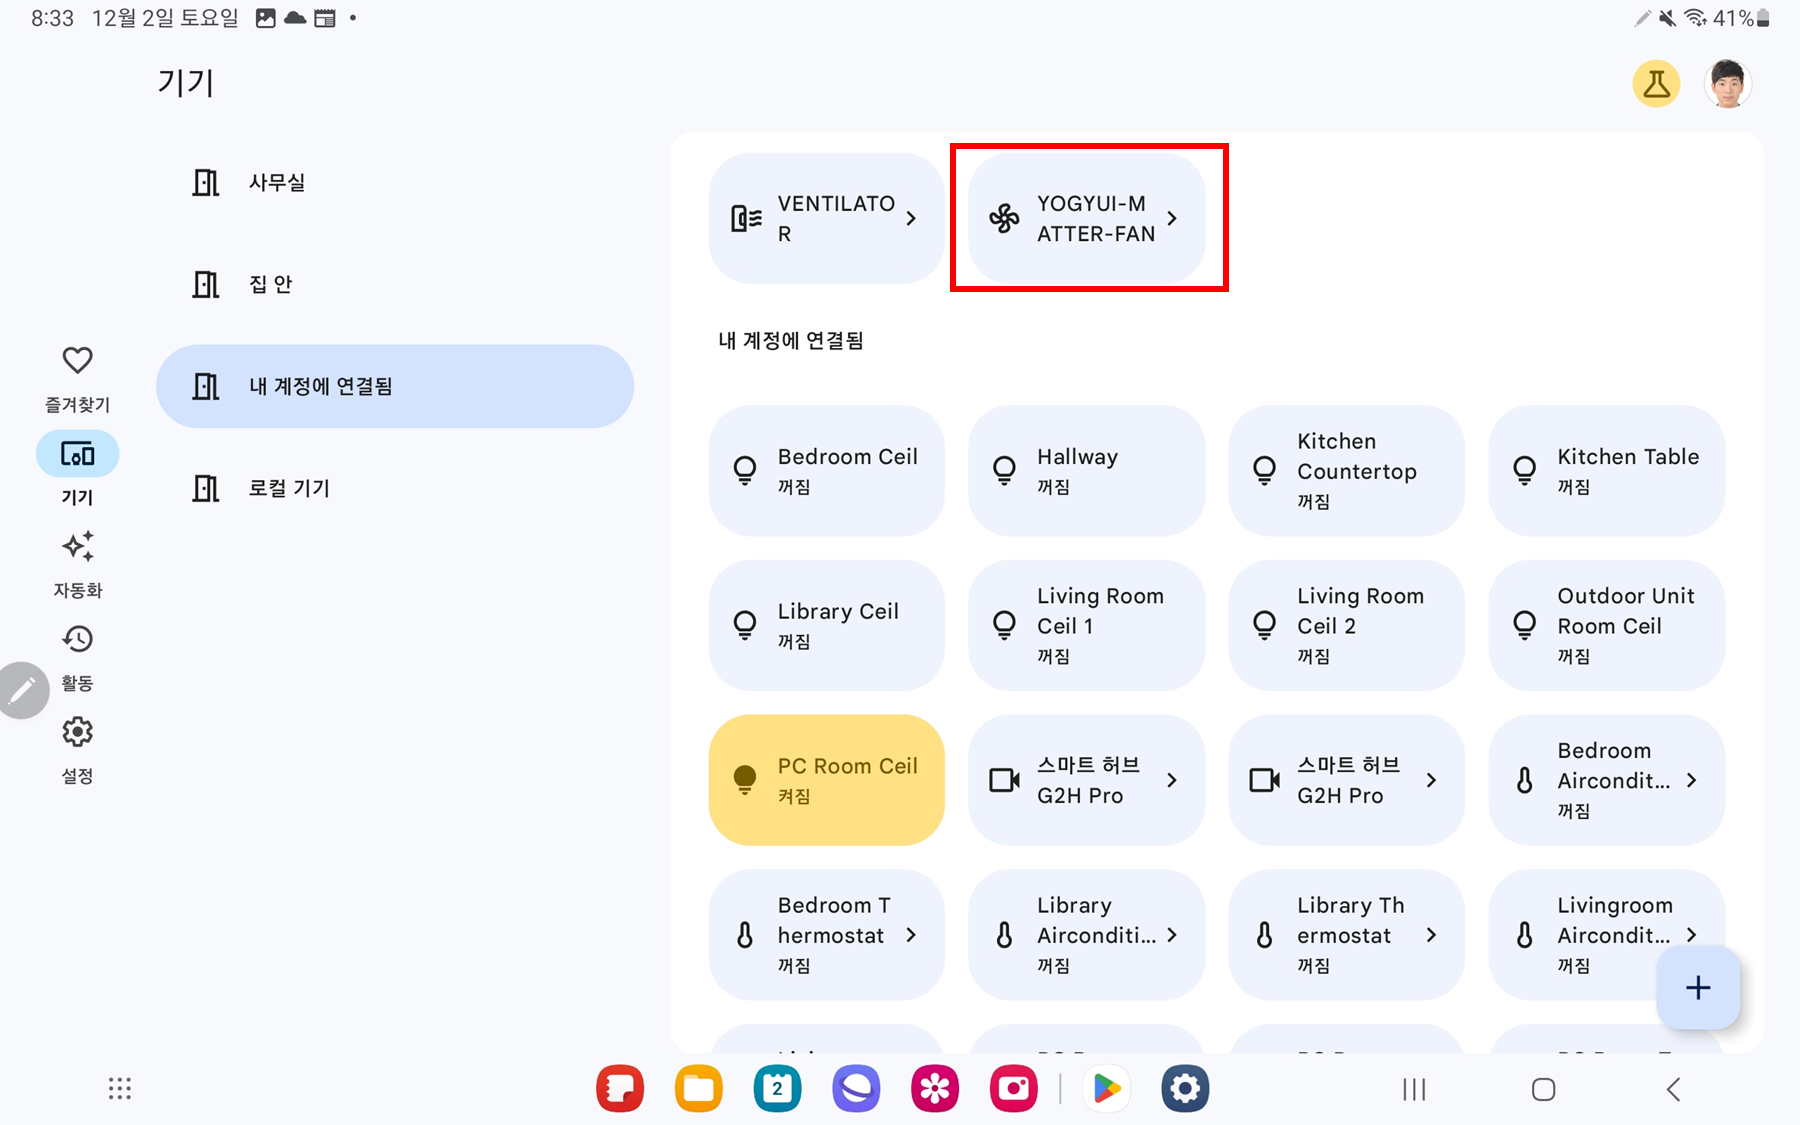
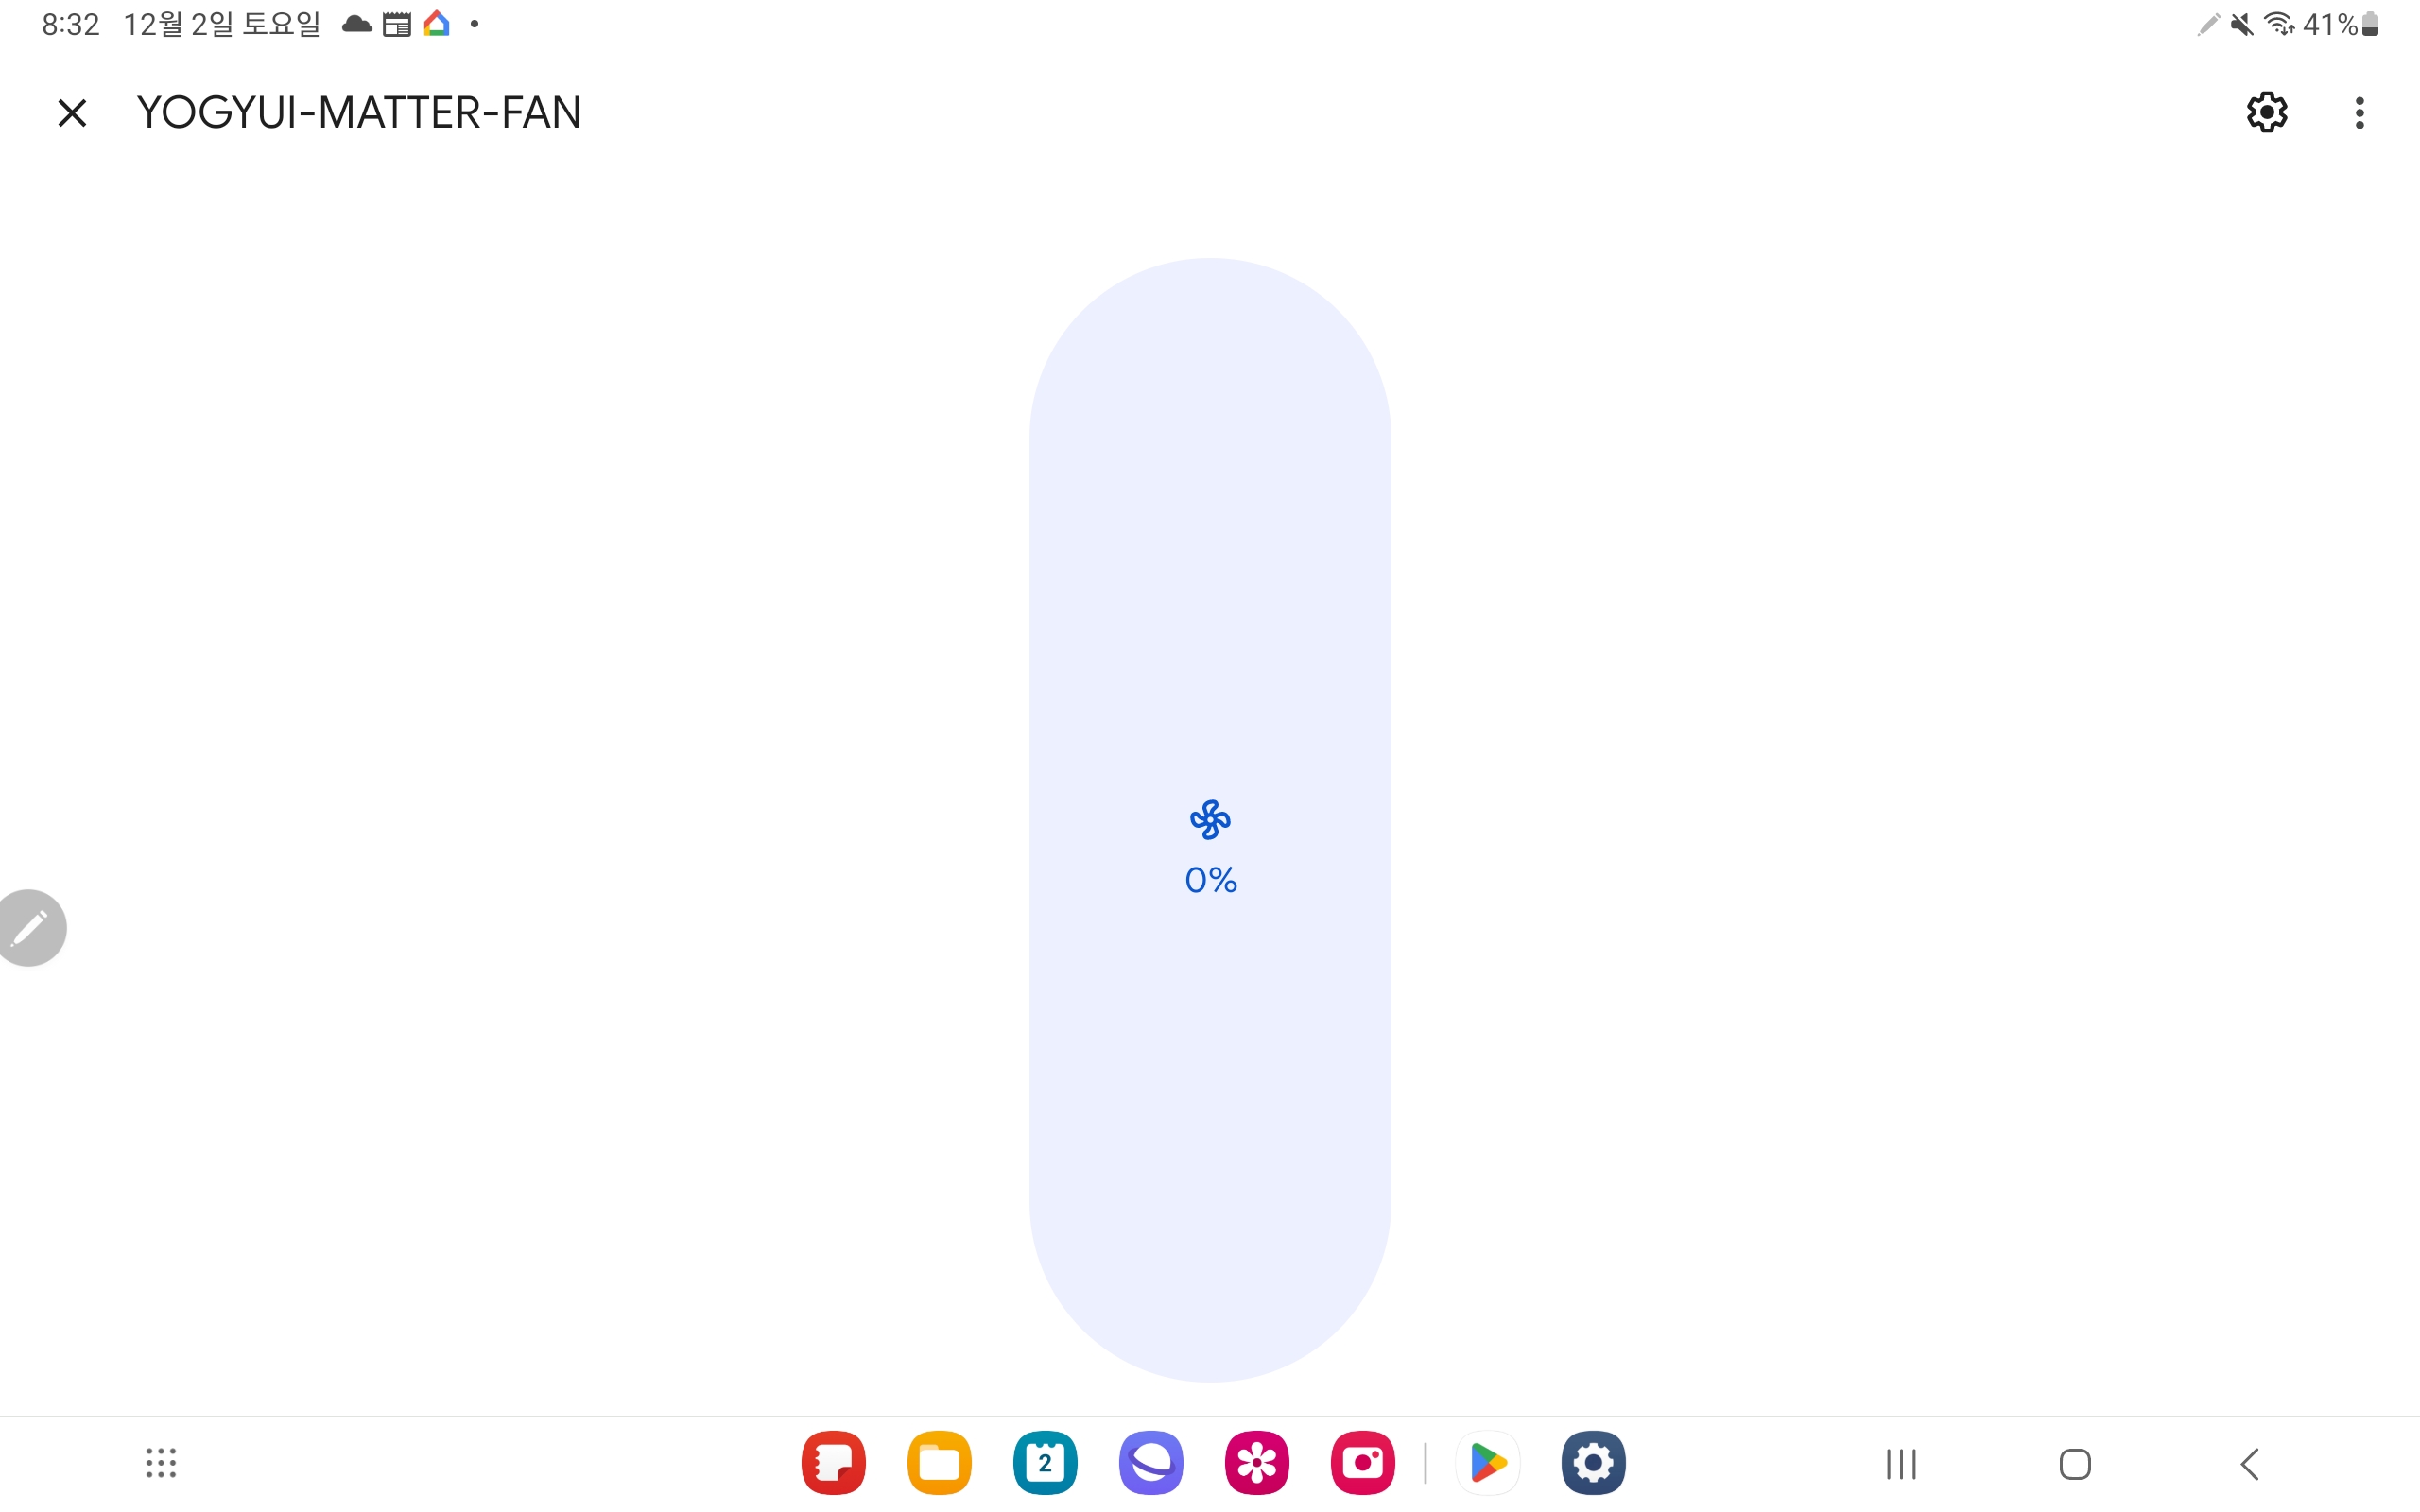
아직 Matter 1.2 배포가 된지 얼마 되지 않아서인지, 아니면 내가 뭔가 설정을 놓친게 있는지는 모르겠지만, 액세서리 제어 UI는 아래와 같이 팬 회전 속도 조절용 슬라이더만 달랑 하나 달려있다 (Off/Low/Med/High 등 FanMode 어트리뷰트의 변경 UI는 아직 정식 배포되지 않은듯?)
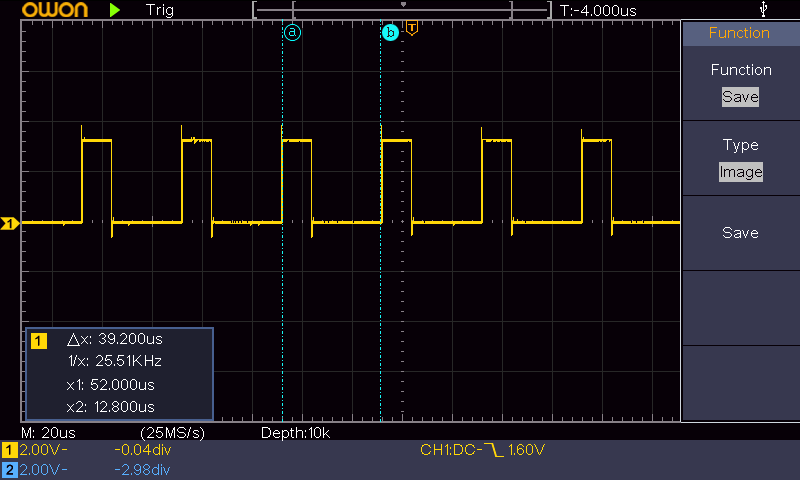
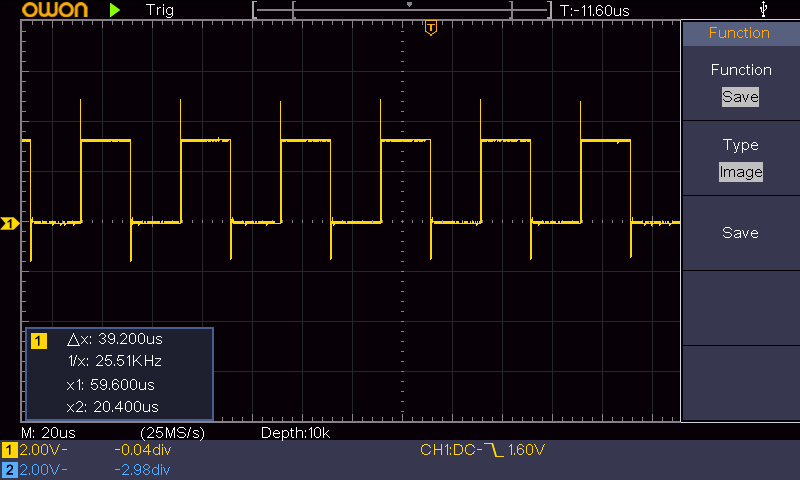
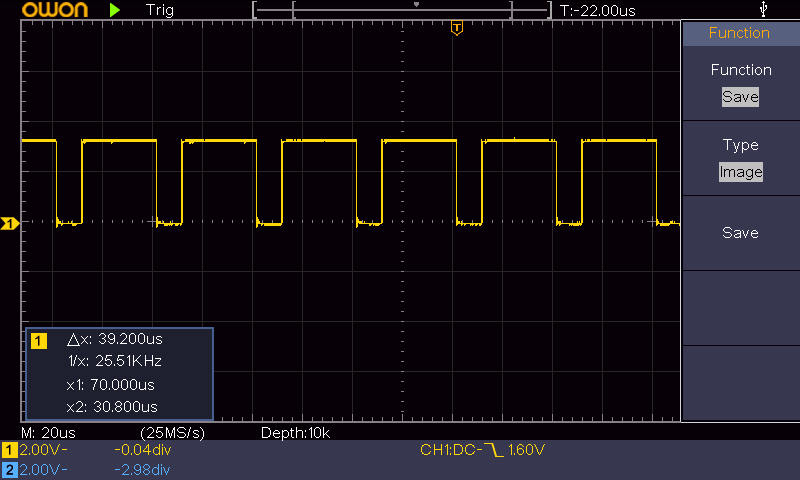
아쉬운대로, 슬라이더 값을 이리저리 변경하면서 PWM 파형이 제대로 바뀌는지 오실로스코프로 찍어봤다
의도한대로 잘 동작하는 것 같다~ ^^
3.2. PWM 파형 측정 및 Matter(CHIP) 로그
3.2.1. 회전속도 30% 설정
I (1006768) esp_matter_attribute: ********** W : Endpoint 0x0001's Cluster 0x00000202's Attribute 0x00000002 is 30 **********
I (1006778) logger: [CDeviceFanControlDCMotor::matter_on_change_attribute_value] cluster: FanControl(0x0202), attribute: PercentSetting(0x0002), value: 30 [device_fanctrl_dcmotor.cpp:140]
I (1006788) esp_matter_attribute: ********** R : Endpoint 0x0001's Cluster 0x00000202's Attribute 0x00000002 is 30 **********
I (1006808) esp_matter_attribute: ********** R : Endpoint 0x0001's Cluster 0x00000202's Attribute 0x0000FFFC is 0 **********
I (1006818) chip[EM]: <<< [E:57883r S:47447 M:92426816 (Ack:83216137)] (S) Msg TX to 1:00000000F23B7986 [57BB] [UDP:[FE80::95D7:AA4A:ADE7:970B%st1]:5540] --- Type 0001:07 (IM:WriteResponse)
I (1006838) esp_matter_attribute: ********** R : Endpoint 0x0001's Cluster 0x00000202's Attribute 0x00000002 is 30 **********
I (1006848) chip[EM]: <<< [E:15282i S:47447 M:92426817] (S) Msg TX to 1:00000000F23B7986 [57BB] [UDP:[FE80::95D7:AA4A:ADE7:970B%st1]:5540] --- Type 0001:05 (IM:ReportData)
I (1006878) chip[EM]: >>> [E:57883r S:47447 M:83216138 (Ack:92426816)] (S) Msg RX from 1:00000000F23B7986 [57BB] --- Type 0000:10 (SecureChannel:StandaloneAck)
I (1006898) chip[EM]: >>> [E:15282i S:47447 M:83216139 (Ack:92426817)] (S) Msg RX from 1:00000000F23B7986 [57BB] --- Type 0001:01 (IM:StatusResponse)
I (1006898) chip[IM]: Received status response, status is 0x00
3.2.2. 회전속도 50% 설정
I (1592118) esp_matter_attribute: ********** W : Endpoint 0x0001's Cluster 0x00000202's Attribute 0x00000002 is 50 **********
I (1592128) logger: [CDeviceFanControlDCMotor::matter_on_change_attribute_value] cluster: FanControl(0x0202), attribute: PercentSetting(0x0002), value: 50 [device_fanctrl_dcmotor.cpp:140]
I (1592148) esp_matter_attribute: ********** R : Endpoint 0x0001's Cluster 0x00000202's Attribute 0x00000002 is 50 **********
I (1592158) esp_matter_attribute: ********** R : Endpoint 0x0001's Cluster 0x00000202's Attribute 0x0000FFFC is 0 **********
I (1592168) chip[EM]: <<< [E:57891r S:47447 M:92426874 (Ack:83216178)] (S) Msg TX to 1:00000000F23B7986 [57BB] [UDP:[FE80::95D7:AA4A:ADE7:970B%st1]:5540] --- Type 0001:07 (IM:WriteResponse)
I (1592188) esp_matter_attribute: ********** R : Endpoint 0x0001's Cluster 0x00000202's Attribute 0x00000002 is 50 **********
I (1592208) chip[EM]: <<< [E:15307i S:47447 M:92426875] (S) Msg TX to 1:00000000F23B7986 [57BB] [UDP:[FE80::95D7:AA4A:ADE7:970B%st1]:5540] --- Type 0001:05 (IM:ReportData)
I (1592218) chip[EM]: >>> [E:57891r S:47447 M:83216179 (Ack:92426874)] (S) Msg RX from 1:00000000F23B7986 [57BB] --- Type 0000:10 (SecureChannel:StandaloneAck)
I (1592248) chip[EM]: >>> [E:15307i S:47447 M:83216180 (Ack:92426875)] (S) Msg RX from 1:00000000F23B7986 [57BB] --- Type 0001:01 (IM:StatusResponse)
I (1592248) chip[IM]: Received status response, status is 0x00
3.2.3. 회전속도 75% 설정
I (1834298) esp_matter_attribute: ********** W : Endpoint 0x0001's Cluster 0x00000202's Attribute 0x00000002 is 75 **********
I (1834308) logger: [CDeviceFanControlDCMotor::matter_on_change_attribute_value] cluster: FanControl(0x0202), attribute: PercentSetting(0x0002), value: 75 [device_fanctrl_dcmotor.cpp:140]
I (1834328) esp_matter_attribute: ********** R : Endpoint 0x0001's Cluster 0x00000202's Attribute 0x00000002 is 75 **********
I (1834338) esp_matter_attribute: ********** R : Endpoint 0x0001's Cluster 0x00000202's Attribute 0x0000FFFC is 0 **********
I (1834358) chip[EM]: <<< [E:57897r S:47447 M:92426908 (Ack:83216204)] (S) Msg TX to 1:00000000F23B7986 [57BB] [UDP:[FE80::95D7:AA4A:ADE7:970B%st1]:5540] --- Type 0001:07 (IM:WriteResponse)
I (1834378) esp_matter_attribute: ********** R : Endpoint 0x0001's Cluster 0x00000202's Attribute 0x00000002 is 75 **********
I (1834388) chip[EM]: <<< [E:15321i S:47447 M:92426909] (S) Msg TX to 1:00000000F23B7986 [57BB] [UDP:[FE80::95D7:AA4A:ADE7:970B%st1]:5540] --- Type 0001:05 (IM:ReportData)
I (1834398) chip[EM]: >>> [E:57897r S:47447 M:83216205 (Ack:92426908)] (S) Msg RX from 1:00000000F23B7986 [57BB] --- Type 0000:10 (SecureChannel:StandaloneAck)
I (1834428) chip[EM]: >>> [E:15321i S:47447 M:83216206 (Ack:92426909)] (S) Msg RX from 1:00000000F23B7986 [57BB] --- Type 0001:01 (IM:StatusResponse)
I (1834428) chip[IM]: Received status response, status is 0x00
블로그 포스팅용 자료를 수집하다보니 너무 귀찮아져서 Apple Home에 Multi Provisioning해서 애플 기기에서의 제어도 테스트해보는 작업을 놓쳤다..
나중에 구글 홈 앱이 Fan Cluster에 대한 UI가 업데이트된다던가, 혹은 내가 놓친 설정이 있다면 글을 추가로 포스팅하면서 애플 관련 내용도 같이 첨부해야겠다 ^^;
끝~!

'PROJECT' 카테고리의 다른 글
| [PROJ] Matter 이산화탄소 농도 측정 클러스터 개발 예제 (ESP32) (0) | 2024.02.18 |
|---|---|
| [PROJ] Matter 온도/상대습도 측정 클러스터 개발 예제 (ESP32) (0) | 2024.02.15 |
| [PROJ] Matter::ColorControl 클러스터 개발 예제 (ESP32) (0) | 2023.06.13 |
| [PROJ] Matter::LevelControl 클러스터 개발 예제 (ESP32) (0) | 2023.03.28 |
| [PROJ] Matter::OnOff 클러스터 개발 예제 (ESP32) (5) | 2023.03.25 |


