
| 일 | 월 | 화 | 수 | 목 | 금 | 토 |
|---|---|---|---|---|---|---|
| 1 | 2 | 3 | 4 | |||
| 5 | 6 | 7 | 8 | 9 | 10 | 11 |
| 12 | 13 | 14 | 15 | 16 | 17 | 18 |
| 19 | 20 | 21 | 22 | 23 | 24 | 25 |
| 26 | 27 | 28 | 29 | 30 | 31 |
- matter
- Home Assistant
- 티스토리챌린지
- esp32
- 홈네트워크
- 코스피
- 오블완
- Bestin
- Espressif
- MQTT
- Python
- 현대통신
- Apple
- RS-485
- 국내주식
- 공모주
- homebridge
- 힐스테이트 광교산
- 해외주식
- 나스닥
- raspberry pi
- 파이썬
- ConnectedHomeIP
- 배당
- 애플
- 미국주식
- 월패드
- 엔비디아
- 퀄컴
- 매터
- Today
- Total
YOGYUI
ESP8266에서 MQTT 구동하기 본문

ESP8266 WiFi Module에서 MQTT 프로토콜로 메시지를 구독(subscribe) 및 발행(publish)해보자 (Arduino IDE 기반)
MQTT broker(mosquitto)는 현재 라즈베리파이에서 구동중이다 (자세한 내용은 링크를 참고)
※ 본 포스팅에서는 GPIO에 연결된 LED 한개를 On/Off하는 단순한 예시를 다룬다
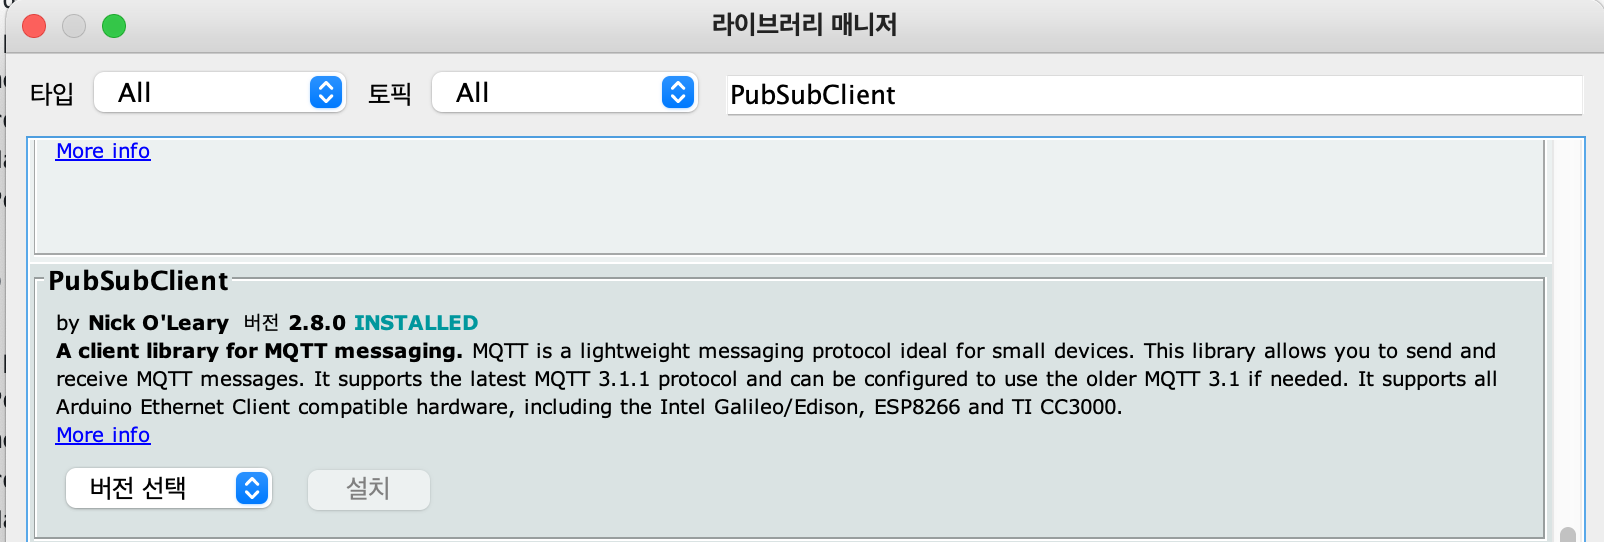
1. 라이브러리 설치
라이브러리 매니저에서 "PubSubClient"를 검색 후 설치 (PubSubClinet API 문서 링크)
[옵션] EspMQTTClient: PubSubClient 라이브러리를 기반으로 구현한 ESP8266/ESP32에 특화된 라이브러리
ESP기반 MQTT 사용시 코드 간소화가 가능하다
라이브러리 포함하기 - PubSubClient 항목이 새로 생긴 것을 확인할 수 있다

라이브러리를 불러오기하면 코드에 헤더파일 불러오기 line이 자동으로 추가된다
#include <PubSubClient.h>2. ESP826 펌웨어 구현
ESP8266 베이스의 기판 아무거나 하나 골라서 테스트 (여기서는 Keyes ESP8266 보드 사용)
LED는 D0 (GPIO16)에 꽂아놓고, LED On/Off state 변수를 mqtt 통신을 통해 쿼리/변경할 수 있도록 구현
// esp8266_mqtt_client.ino
#include <ESP8266WiFi.h>
#include <PubSubClient.h>

int LED_PIN = 16;
int led_state = 1;
long last_send_time = 0;
char publish_msg[16];

const char* WIFI_SSID = "당신의 WiFi SSID";
const char* WIFI_PW = "당신의 WiFi Password";
const char* MQTT_BROKER_ADDR = "당신의 MQTT Broker 주소";
const int   MQTT_BROKER_PORT = 1883;
const char* MQTT_ID = "당신의 MQTT Broker ID"; // optional
const char* MQTT_PW = "당신의 MQTT Broker Password";  // optional

WiFiClient wifi_client;
PubSubClient mqtt_client(wifi_client);

void setup() {
  pinMode(LED_PIN, OUTPUT);
  digitalWrite(LED_PIN, led_state);

  Serial.begin(115200);
  Serial.println();

  WiFi.begin(WIFI_SSID, WIFI_PW);
  Serial.print("WiFi Connecting");
  while (WiFi.status() != WL_CONNECTED)
  {
    delay(500);
    Serial.print(".");
  }
  Serial.println();

  Serial.print("Connected, IP address: ");
  Serial.println(WiFi.localIP());
  Serial.printf("MAC address = %s\n", WiFi.softAPmacAddress().c_str());

  // setup MQTT Client
  mqtt_client.setServer(MQTT_BROKER_ADDR, MQTT_BROKER_PORT);
  mqtt_client.setCallback(mqtt_callback);
}

void mqtt_callback(char* topic, byte* payload, unsigned int length) {
  Serial.print("Message arrived [");
  Serial.print(topic);
  Serial.print("] ");
  for (int i = 0; i < length; i++) {
    Serial.print((char)payload[i]);
  }
  Serial.println();

  if (int(payload[length -3] - '0')) {
    led_state = 1;
    digitalWrite(LED_PIN, led_state);
  } else {
    led_state = 0;
    digitalWrite(LED_PIN, led_state);
  }
  last_send_time = millis();
  sprintf(publish_msg, "%d", led_state);
  mqtt_client.publish("esp8266_test/led/state", publish_msg);
}

void establish_mqtt_connection() {
  if (mqtt_client.connected())
    return;

  while (!mqtt_client.connected()) {
    Serial.println("Try to connect MQTT Broker");
    if (mqtt_client.connect("ESP8266_Client", MQTT_ID, MQTT_PW)) {
      Serial.println("Connected");
      mqtt_client.subscribe("esp8266_test/led/command");
    } else {
      Serial.print("failed, rc=");
      Serial.print(mqtt_client.state());
      delay(2000);
    }
  }
}

void loop() {
  establish_mqtt_connection();
  mqtt_client.loop();

  long current = millis();
  if (current - last_send_time > 1000) {
    last_send_time = current;
    sprintf(publish_msg, "%d", led_state);
    mqtt_client.publish("esp8266_test/led/state", publish_msg);
  }
}
MQTT Broker 연결 후
- "esp8266_test/led/command" 토픽 구독
message 들어오면 파싱 후 LED 상태 변경 후 상태 변경 알림 토픽 발생
- loop 문에서 1초에 한번씩 "esp8266_test/led/state" 토픽으로 현재 LED State를 발행
3. MQTT Client 구현 (python)
PyQt5를 사용해서 GUI로 동작테스트하기 위한 코드를 구현
# esp8266_mqtt_test.py
import json
import paho.mqtt.client as mqtt  # pip install paho-mqtt
from PyQt5.QtWidgets import QApplication, QMainWindow, QPushButton, QLabel, QWidget, QVBoxLayout

class MyWindow(QMainWindow):
    def __init__(self):
        super().__init__()
        self.mqtt_client = mqtt.Client()
        self.mqtt_client.on_connect = self.on_mqtt_connect
        self.mqtt_client.on_message = self.on_mqtt_message
        self.btnLedOn = QPushButton('ON')
        self.btnLedOff = QPushButton('OFF')
        self.labelState = QLabel('State')
        self.mqtt_client.username_pw_set(username="lee2002w", password="Lsh312453124%")
        self.mqtt_client.connect('yogyui.iptime.org', 30003)
        self.mqtt_client.loop_start()
        self.initLayout()
        self.initControls()

    def release(self):
        self.mqtt_client.loop_stop()
        self.mqtt_client.disconnect()

    def initLayout(self):
        wgt = QWidget()
        self.setCentralWidget(wgt)
        vbox = QVBoxLayout(wgt)
        vbox.addWidget(self.labelState)
        vbox.addWidget(self.btnLedOn)
        vbox.addWidget(self.btnLedOff)

    def initControls(self):
        self.btnLedOn.clicked.connect(lambda: self.mqtt_publish(1))
        self.btnLedOff.clicked.connect(lambda: self.mqtt_publish(0))

    def on_mqtt_connect(self, client, userdata, flags, rc):
        self.mqtt_client.subscribe('esp8266_test/led/state')

    def on_mqtt_message(self, client, userdata, message):
        topic = message.topic
        msg_dict = json.loads(message.payload.decode("utf-8"))
        if msg_dict == 1:
            self.labelState.setText('State: ON')
        else:
            self.labelState.setText('State: OFF')

    def mqtt_publish(self, onoff: int):
        self.mqtt_client.publish('esp8266_test/led/command', json.dumps({"onoff": f"{onoff}"}), 1)

if __name__ == '__main__':
    app = QApplication([])
    wnd = MyWindow()
    wnd.show()
    app.exec_()
    wnd.release()
4. 동작 테스트
문제없이 잘 동작한다
참고 사이트:
pubsubclient.knolleary.net/api#subscribe
blog.naver.com/PostView.nhn?blogId=roboholic84&logNo=221232207387
'Hardware > Arduino' 카테고리의 다른 글
| (CJMCU-2812-16) WS2812 RGB LED Array (x16 Ring) (0) | 2021.03.01 |
|---|---|
| ArduinoJson Document - Key 존재 여부 확인 (0) | 2021.02.15 |
| Keyes ESP8266 WiFi Module (0) | 2021.01.31 |
| Adafruit HT16K33 Backpack + LED Display (14-segment) (0) | 2021.01.28 |


