| 일 | 월 | 화 | 수 | 목 | 금 | 토 |
|---|---|---|---|---|---|---|
| 1 | 2 | 3 | ||||
| 4 | 5 | 6 | 7 | 8 | 9 | 10 |
| 11 | 12 | 13 | 14 | 15 | 16 | 17 |
| 18 | 19 | 20 | 21 | 22 | 23 | 24 |
| 25 | 26 | 27 | 28 | 29 | 30 | 31 |
- 홈네트워크
- matter
- 티스토리챌린지
- esp32
- 스타벅스
- MQTT
- 파이썬
- 애플
- 해외주식
- homebridge
- 오블완
- 국내주식
- 배당
- 엔비디아
- raspberry pi
- Python
- ConnectedHomeIP
- 월패드
- 코스피
- 삼성전자
- 힐스테이트 광교산
- RS-485
- Home Assistant
- 미국주식
- 취미생활
- 현대통신
- Bestin
- 매터
- 나스닥
- Apple
- Today
- Total
YOGYUI
DFRobot DHT22(AM2302) Temperature/Humidity Sensor 본문
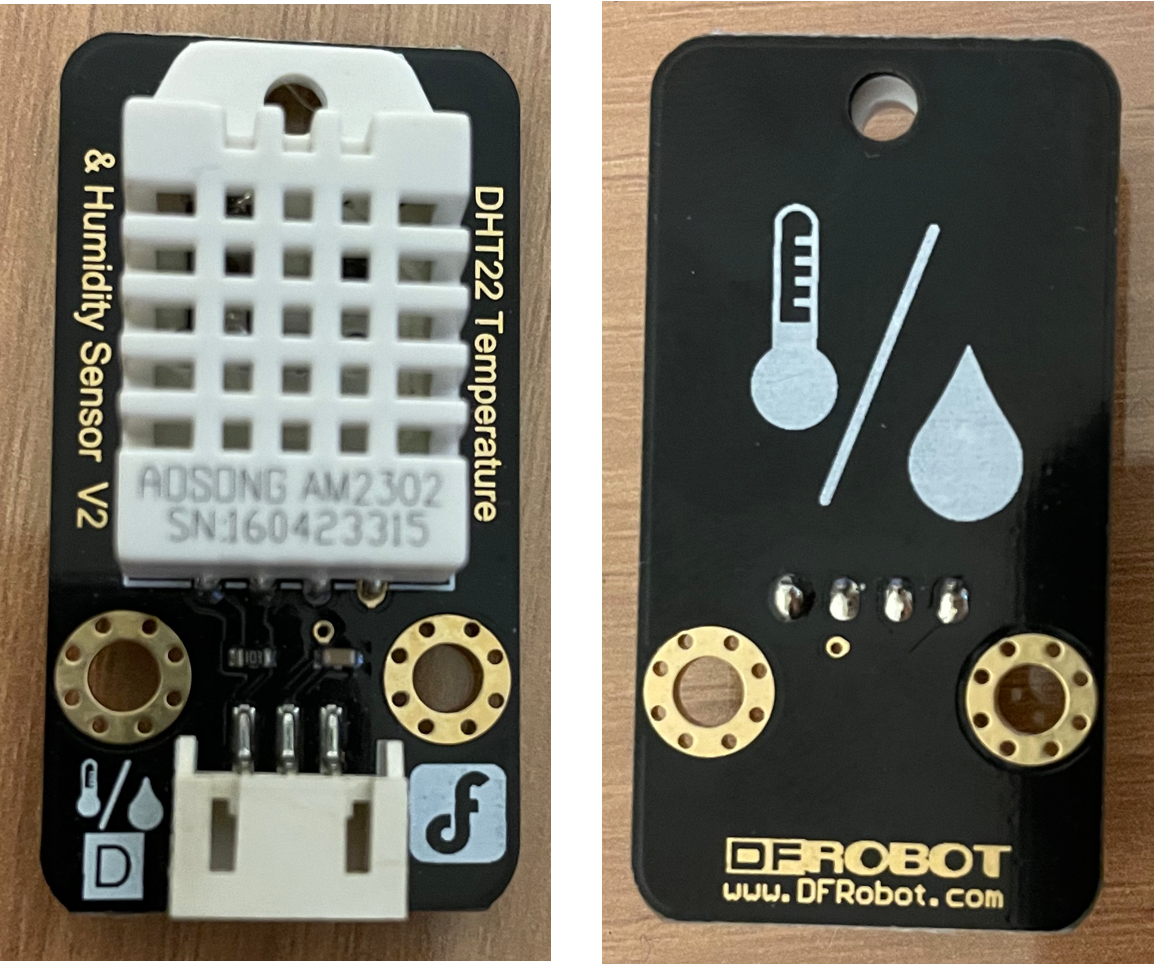
1. Hardware
중국 Kuongshun Electronic사에서 제작한 AM2302 온습도 센서가 장착된 모듈
(DFRobot, Adafruit, Sparkfun 등 다양한 서드파티에서 만든 모듈이 있으니 입맛대로 골라 사면 된다)
DFRobot 공식 소개 페이지: SKU:SEN0137
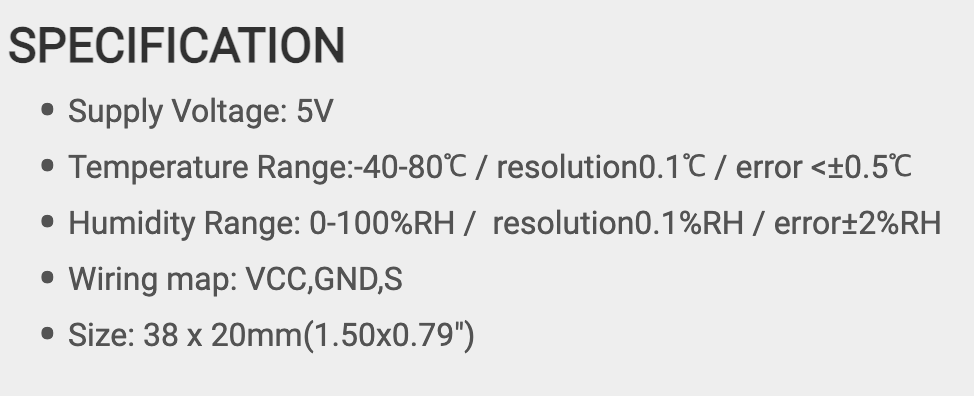
DHT22이라는 이름으로도 널리 알려져있으며(DHT는 Digital Humidity and Temperature의 약자), 아두이노 입문자가 아마도 가장 먼저 접하게 되는 센서 중 하나
(워낙에 저렴하다보니 왠만한 Starter Kit에는 기본으로 포함되어 있는 것 같다)
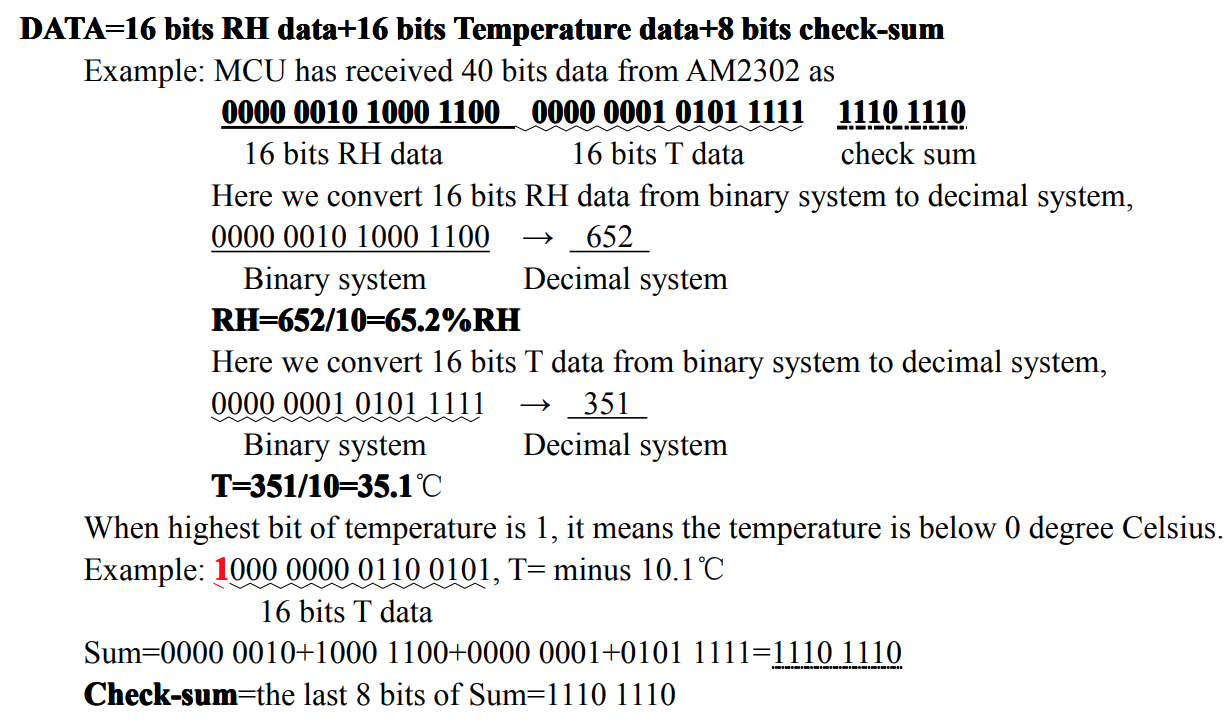
SPI나 I2C가 아닌 1-line digital 데이터 통신 방식이기 때문에 코딩 입문자를 위한 도전과제로도 적당하다
가성비가 좋다고는 하는데, 정밀도 (특히 습도) 측면에서는 아쉬운게 사실이다
고정밀도를 요하는 산업현장이나 의료기기에 사용하기보다는, IoT 및 홈오토메이션 영역에 적용하기에 적당한 제품
2. Prototyping
Adafruit는 DHT 센서 시리즈(DHT11, DHT12, DHT21, DHT22)에 대한 아두이노 라이브러리를 제공한다
(찾아보면 다른 서드파티들의 라이브러리도 많다)

해당 라이브러리의 DHT::read() 메서드에 1-line 데이터라인 패킷 파싱 구문이 잘 구현되어 있으니 참고
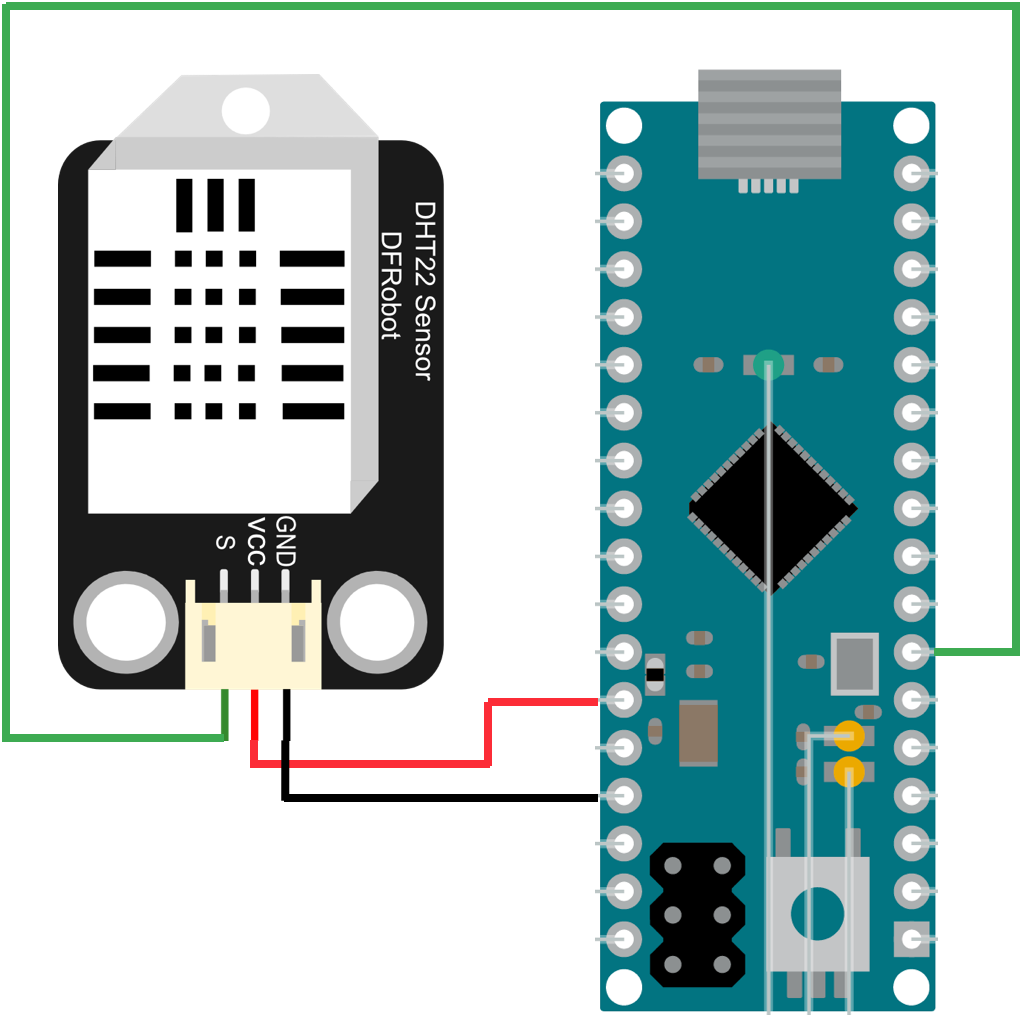
GPIO2에 Signal Line을 연결 (전원은 +5V, GND)
// DHT22_test.ino
#include "DHT.h"

const int DHT_PIN = 2;
DHT dht(DHT_PIN, DHT22);

void setup() {
  Serial.begin(115200);
  dht.begin();
}

void loop() {
  delay(2000);
  float humidity = dht.readHumidity();
  float temperature = dht.readTemperature();

  Serial.print("Temperature: ");
  Serial.print(temperature, 2);
  Serial.print(", Humidity: ");
  Serial.println(humidity, 2);
}
loop문에서 2초 간격으로 센서 데이터를 읽는데, 이는 센서 데이터 취득 및 패킷 전송에 소요되는 시간을 고려한 결과로 데이터시트에 다음과 같이 명시되어 있다

상용 온습도 센서와 측정값을 비교해보자
상용 제품의 측정값과 센서 측정값 사이의 차이가 꽤나 크다
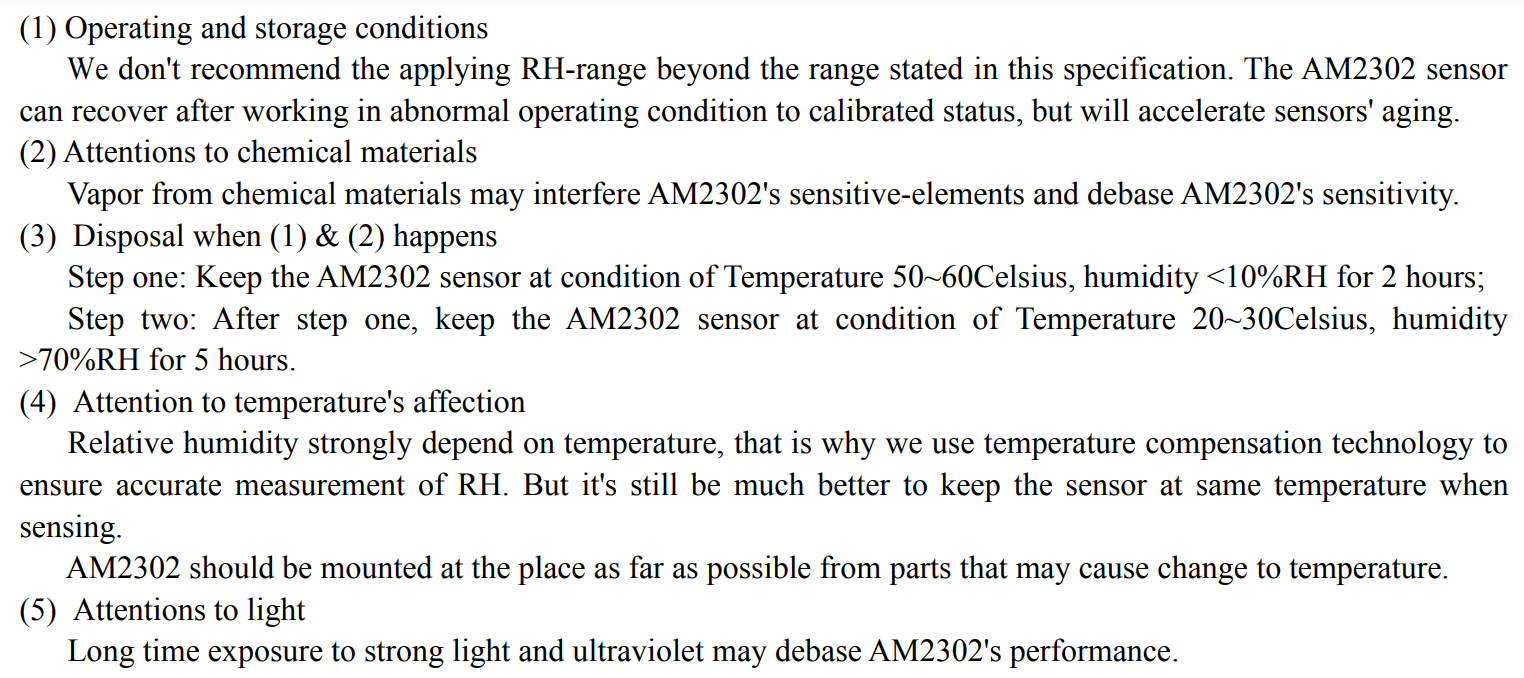
데이터시트에는 다음과 같은 주의사항이 명시되어 있다

-
Calibration 데이터는 출고시에 내부 MCU 메모리에 내장되며 사용자가 따로 보정할 수 있는 프로세스는 없다
-
Spec을 벗어나는 환경에 노출되었을 시 해결책 (일반 가정집에서는 이런 환경 만드는게 더 어렵다...)
1. 50 ~ 60도, 상대습도 10% 이하 환경에 2시간 노출
2. 20 ~30도, 상대습도 70% 이상 환경에 5시간 노출
-
상대습도는 온도에 강하게 영향을 받는다
아무래도 구매한지 7년이 넘었고 가끔씩 사용하다보니 노후화되지 않았나 추측만 해본다 ㅠㅠ
실제 사용보다는 사용법 정리에 초점을 맞추고 있으니 아쉽지만 문제 해결을 위해 많은 시간을 쓰지는 않기로 한다
3. Advanced
ESP8266 WiFi 모듈과 결합하여 온습도 측정값을 MQTT 프로토콜로 발행하고, 측정값을 읽을 수 있는 웹서버를 구축해보자
ESP8266 + MQTT 기본 예제는 링크를 참고한다
[아두이노 코드]
// dht22_mqtt_publish.ino
#include "DHT.h"
#include <ESP8266WiFi.h>
#include <PubSubClient.h>
#include <ArduinoJson.h>

const int DHT_PIN = 2;
DHT dht(DHT_PIN, DHT22);

char publish_msg[256];
StaticJsonDocument<256> json_doc;
long last_acq_time = 0;

const char* WIFI_SSID = "당신의 WiFi SSID";
const char* WIFI_PW = "당신의 WiFi Password";
const char* MQTT_BROKER_ADDR = "당신의 MQTT Broker 주소";
const int   MQTT_BROKER_PORT = 1883;
const char* MQTT_ID = "당신의 MQTT BrokerID"; // optional
const char* MQTT_PW = "당신의 MQTT Broker Password";  // optional

WiFiClient wifi_client;
PubSubClient mqtt_client(wifi_client);

void setup() {
  Serial.begin(115200);
  dht.begin();

  WiFi.begin(WIFI_SSID, WIFI_PW);
  Serial.print("WiFi Connecting");
  while (WiFi.status() != WL_CONNECTED)
  {
    delay(500);
    Serial.print(".");
  }
  Serial.println();

  Serial.print("Connected, IP address: ");
  Serial.println(WiFi.localIP());
  Serial.printf("MAC address = %s\n", WiFi.softAPmacAddress().c_str());

  // setup MQTT Client
  mqtt_client.setServer(MQTT_BROKER_ADDR, MQTT_BROKER_PORT);
}

void establish_mqtt_connection() {
  if (mqtt_client.connected())
    return;
  while (!mqtt_client.connected()) {
    Serial.println("Try to connect MQTT Broker");
    if (mqtt_client.connect("ESP8266_Client", MQTT_ID, MQTT_PW)) {
      Serial.println("Connected");
    } else {
      Serial.print("failed, rc=");
      Serial.print(mqtt_client.state());
      delay(2000);
    }
  }
}

void loop() {
  establish_mqtt_connection();
  mqtt_client.loop();

  long current = millis();
  if (current - last_acq_time > 2000) {
    last_acq_time = current;
    json_doc["temperature"] = dht.readTemperature();
    json_doc["humidity"] = dht.readHumidity();
    size_t n = serializeJson(json_doc, publish_msg);
    mqtt_client.publish("esp8266_test/sensor", publish_msg, n);
    Serial.println("Published");
  }
}
MQTT Publish 할때 JSON을 활용하기 위해 ArduinoJson 라이브러리를 사용했다
자세한 사용법은 링크 참고 (한페이지에 깔끔하게 사용법이 요약되어있다)
[서버 코드 (파이썬, Flask)]
import json
import paho.mqtt.client as mqtt
from flask import Flask, render_template, jsonify

class SensorData:
    temperature: float = 0
    humidity: float = 0

data = SensorData()
app = Flask(__name__)
mqtt_client = mqtt.Client()
mqtt_client.username_pw_set(
    username="MQTT Broker ID",
    password="MQTT Broker Password"
)

@app.route('/')
def index():
    return render_template('index.html')

@app.route('/update', methods=['POST'])
def update():
    return jsonify({
        'temperature': data.temperature,
        'humidity': data.humidity
    })

def on_mqtt_connect(client, userdata, flags, rc):
    mqtt_client.subscribe('esp8266_test/sensor')

def on_mqtt_message(client, userdata, message):
    print(f'Message: {message.topic}, {message.payload}')
    msg_dict = json.loads(message.payload.decode("utf-8"))
    data.temperature = msg_dict['temperature']
    data.humidity = msg_dict['humidity']

mqtt_client.on_message = on_mqtt_message
mqtt_client.on_connect = on_mqtt_connect

if __name__ == '__main__':
    mqtt_client.connect('MQTT Broker 주소', 1883)
    mqtt_client.loop_start()
    app.run(host='127.0.0.1', port=9999, debug=True)
    mqtt_client.loop_stop()
    mqtt_client.disconnect()
<!-- index.html -->
<!DOCTYPE html>
<head>
<script src="https://ajax.googleapis.com/ajax/libs/jquery/3.3.1/jquery.min.js"></script>
</head>
<body>
<a>Temperature</a>
<h1 id="temperature"></h1>
<a>Humidity</a>
<h1 id="humidity"></h1>
<script> setInterval(function(){$.ajax({
url: '/update',
type: 'POST',
success: function(response) {
console.log(response);
$("#temperature").html(response["temperature"]);
$("#humidity").html(response["humidity"]);
},
error: function(error) {
console.log(error);
}
})}, 2000);
</script>
</body>
[결과물]
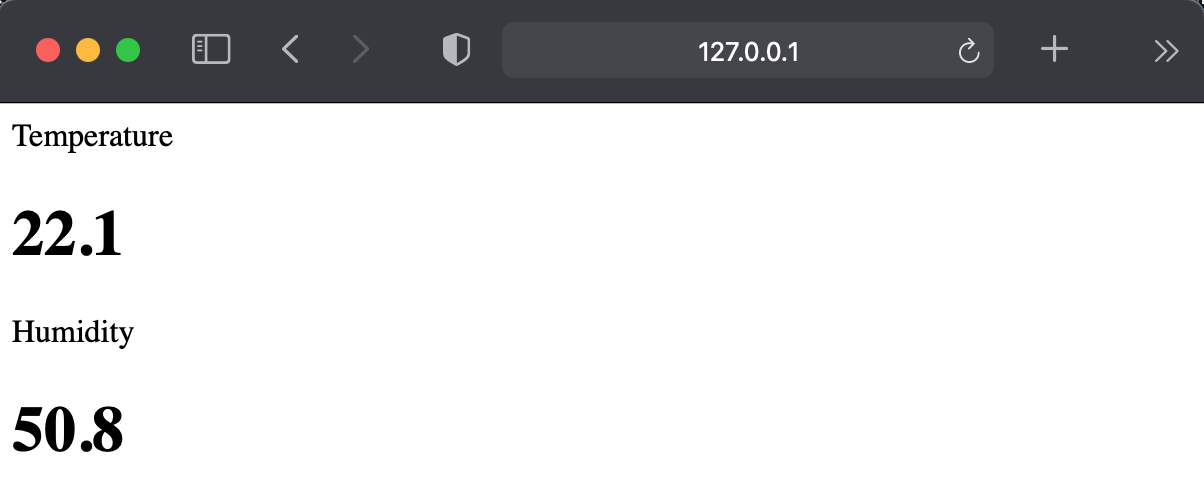
센서데이터 읽기, WiFi 네트워크 접속, MQTT Broker 접속 및 JSON 데이터 발행 등 다양한 기능들을 라이브러리들을 활용해 간단하게 구현할 수 있는 것을 알 수 있다 (오픈소스 하드웨어 및 소프트웨어의 최대 강점)
※ 하드웨어는 이 상태 그대로 애플 홈킷이나 구글 홈어시스턴트와도 바로 연계할 수 있다
끝~
'Hardware > Sensor' 카테고리의 다른 글
| Adafruit TCS34725 RGB Color Sensor with IR Filter & LED (0) | 2021.02.14 |
|---|---|
| DFRobot BMP180 Barometer Sensor (0) | 2021.02.02 |
| DFRobot PT550 Analog Ambient Light Sensor (0) | 2021.01.29 |
| IKEA TRADFRI Motion Sensor 단독으로 홈킷 연동하기 (homebridge) (0) | 2021.01.15 |


