
- 분류 전체보기 (717)

| 일 | 월 | 화 | 수 | 목 | 금 | 토 |
|---|---|---|---|---|---|---|
| 1 | ||||||
| 2 | 3 | 4 | 5 | 6 | 7 | 8 |
| 9 | 10 | 11 | 12 | 13 | 14 | 15 |
| 16 | 17 | 18 | 19 | 20 | 21 | 22 |
| 23 | 24 | 25 | 26 | 27 | 28 | 29 |
| 30 | 31 |
- Bestin
- 해외주식
- Python
- 애플
- ConnectedHomeIP
- 나스닥
- matter
- MQTT
- 공모주
- 파이썬
- raspberry pi
- Espressif
- 월패드
- Home Assistant
- 티스토리챌린지
- 국내주식
- 코스피
- 매터
- RS-485
- Apple
- 현대통신
- 홈네트워크
- 미국주식
- 힐스테이트 광교산
- esp32
- 라즈베리파이
- 오블완
- 마이크로소프트
- homebridge
- 배당
- Today
- Total
YOGYUI
LG ThinQ 스마트솔루션 API: AWS IoT MQTT Broker (2) 본문

Utilize LG ThinQ Smart Solution API: AWS IoT Core MQTT (2)
[LG ThinQ 스마트솔루션 API 포스팅 시리즈]
LG ThinQ(씽큐) 플랫폼 API 공개 및 OpenAPI 사용해보기
LG ThinQ 스마트솔루션 API: AWS IoT MQTT Broker (1)
앞선 글(링크)에서 LG ThinQ 스마트솔루션 API를 사용해 LG ThinQ가 사용하는 아마존 웹 서비스(AWS)에 접근할 수 있도록 TLS/SSL 인증서를 발급받았다
python의 paho-mqtt 패키지를 사용해 AWS IoT MQTT Core에 접속하기 위해서는 총 3개의 인증서가 필요하다
- RSA 알고리즘(2048비트) 기반으로 생성한 공개키-비밀키 쌍 (실제 사용할 때는 비밀키 인증서 파일만 필요)
- 공개키-비밀키 쌍을 사용해 X509 형식으로 생성한 인증서 서명 요청(CSR) 파일
- AWS의 Root CA 인증서 파일
세 파일 모두 PEM(Privacy Enhanced Mail) 포맷으로 로컬에 저장해두면 되며, 본 글에서는 각각 privkey.pem, aws_cert.pem, aws_root_ca.pem 이름으로 저장해 둔 것을 가정하고 코드를 작성했다
1. AWS IoT MQTT Broker 접속하기
1.1. MQTT Client 객체 생성
import paho.mqtt.client as mqtt

client_id: str = "yogyui-thinq-api-tester"  # Thinq API로 클라이언트 등록시 사용한 x-client-id
mqtt_client = mqtt.Client(client_id=client_id)

rootca_pem_path = "./aws_root_ca.pem"
cert_pem_path = "./aws_cert.pem"
privkey_pem_path = "./privkey.pem"
mqtt_client.tls_set(ca_certs=rootca_pem_path, certfile=cert_pem_path, keyfile=privkey_pem_path)
MQTT 클라이언트 객체는 paho.mqtt.client의 Client 클래스로 생성하면 된다
※ 주의: ThinQ API를 통해 '클라이언트 등록' 시 사용한 ID 문자열을 동일하게 MQTT 클라이언트의 ID로 사용해야 하며 (request 헤더의 x-client-id), API를 통해 해당 ID가 등록되어 있어야 브로커에 정상적으로 접속할 수 있다 (등록되지 않았거나 등록 해제된 ID로는 접속 불가능)
1.2. MQTT Client 콜백 함수 설정
def on_mqtt_client_connect(client, userdata, flags, rc):
    # print(client, userdata, flags, rc)
    if rc == 0:
        print("successfully connected to mqtt broker")
    elif rc == 1:
        print("Connection refused: incorrect protocol version")
    elif rc == 2:
        print("Connection refused: invalid client identifier")
    elif rc == 3:
        print("Connection refused: server unavailable")
    elif rc == 4:
        print("Connection refused: bad username or password")
    elif rc == 5:
        print("Connection refused: not authorised")
    else:
        print("Connection refused: unknown reason")

def on_mqtt_client_connect_failed(client, userdata):
    print("failed to connect mqtt broker")

def on_mqtt_client_disconnect(client, userdata, rc):
    print('disconnected from mqtt broker')

def on_mqtt_client_log(client, userdata, level, buf):
    if level == 0x01:  # MQTT_LOG_INFO
        level_str = 'I'
    elif level == 0x02:  # MQTT_LOG_NOTICE
        level_str = 'N'
    elif level == 0x04:  # MQTT_LOG_WARNING
        level_str = 'W'
    elif level == 0x08:  # MQTT_LOG_ERR
        level_str = 'E'
    elif level == 0x10:  # MQTT_LOG_DEBUG
        level_str = 'D'
    else:
        level_str = '?'
    print(f"[{level_str}] {buf}")

def on_mqtt_client_subscribe(client, userdata, mid, granted_qos):
    pass

def on_mqtt_client_message(client, userdata, message):
    pass

def on_mqtt_client_publish(client, userdata, mid):
    pass

mqtt_client.on_connect = on_mqtt_client_connect
mqtt_client.on_connect_fail = on_mqtt_client_connect_failed
mqtt_client.on_disconnect = on_mqtt_client_disconnect
mqtt_client.on_log = on_mqtt_client_log
mqtt_client.on_subscribe = on_mqtt_client_subscribe
mqtt_client.on_message = on_mqtt_client_message
mqtt_client.on_publish = on_mqtt_client_publish
MQTT Client는 접속/접속종료, 로그, 구독, 발행 등 다양한 종류의 호출에 대한 콜백 함수를 제공하고 있으며, 위와 같이 콜백 함수를 대입(=)하는 것으로 간단하게 구현할 수 있다
※ 콜백 함수 내부 코드는 개발자 입맛대로 하면 구현하면 되며, 뒤에서 필요한 부분은 그때그때 수정해서 사용하는 방법을 간단하게 소개할 예정
1.3. MQTT 브로커 접속
MQTT 클라이언트 객체 생성 및 TLS/SSL 인증 정보 설정, 콜백 함수 설정이 끝났으면 ThinQ API로 쿼리한 AWS IoT Core MQTT 브로커 주소로 접속하면 된다
('도메인 이름 조회' API 참고: 포스팅에서는 mqttServer 변수에 문자열로 대입해뒀었음)
idx = mqttServer.rfind(':')
port = int(mqttServer[idx+1:])
host = mqttServer[8:idx]
MQTT 브로커 주소 문자열은 mqtts://xxxxxxxxxxxxxx-ats.iot.ap-northeast-2.amazonaws.com:8883과 같은 포맷을 가지는데, 실제 클라이언트로 접속할 때는 프로토콜 문자열 (mqtts://)는 필요없으면 맨 뒤의 8883은 포트 번호로 따로 사용해줘야 하므로 위와 같이 문자열을 나눠야 한다
mqtt_client.connect(host=host, port=port)
MQTT 클라이언트는 주기적으로 loop 함수를 호출해줘야 내부의 네트워크 이벤트들을 처리할 수 있는데, 다음과 같이 클라이언트가 자체적으로 별도의 쓰레드를 생성해서 루프를 돌릴 수 있도록 메인 이벤트 루프와 분리해주는 것이 좋다
mqtt_client.loop_start()

import time
time.sleep(5)
이번 데모에서는 간단하게 메인 이벤트 루프에서는 sleep 처리만 한 채 클라이언트의 접속 및 로그 콜백 함수를 보며 접속이 제대로 되는지 살펴보도록 한다

인증서, 클라이언트 ID, MQTT 브로커 주소 및 포트가 제대로 설정되었으면 위와 같이 성공적으로 CONNACK을 받고 on_connect 콜백 함수의 return code값이 '0'으로 정상적으로 접속되었음을 알 수 있다
메인 이벤트 루프 종료 시에는 MQTT 클라이언트도 역순으로 다음과 같이 loop 쓰레드를 해제하고 접속 종료해주면 된다
# 메인 이벤트 루프 종료 후
mqtt_client.loop_stop()
mqtt_client.disconnect()
접속 종료 시퀀스에서의 콜백 함수 호출에 의한 로그는 다음과 같다

2. MQTT 토픽 구독하기
구독 및 발행 가능한 MQTT 토픽은 '클라이언트 인증서 발급' API를 호출해 쿼리한 바 있다
(sucscriptions, publications 리스트 변수로 만들어 둔 바 있음)
subscriptions, publications = issue_certificate()구독 가능한 MQTT 토픽의 포맷은 다음과 같다
- app/clients/{x-client-id}/push
- app/clients/{x-client-id}/inbox
토픽 구독은 MQTT 클라이언트가 브로커에 정상적으로 접속된 후 진행하는 것이 좋기 때문에 다음과 같이 on_connect 콜백 함수를 변경해주자
def on_mqtt_client_connect(client, userdata, flags, rc):
    # print(client, userdata, flags, rc)
    if rc == 0:
        print("successfully connected to mqtt broker")
        for topic in subscriptions:
            client.subscribe(topic)
    elif rc == 1:
        print("Connection refused: incorrect protocol version")
    elif rc == 2:
        print("Connection refused: invalid client identifier")
    elif rc == 3:
        print("Connection refused: server unavailable")
    elif rc == 4:
        print("Connection refused: bad username or password")
    elif rc == 5:
        print("Connection refused: not authorised")
    else:
        print("Connection refused: unknown reason")
다시 접속해보면 다음과 같은 로그를 확인할 수 있다

※ 'SUBACK'을 받았으면 정상적으로 구독된 것을 가리킨다
3. 디바이스 푸시 및 이벤트 구독하기
위에서 구독한 MQTT 토픽으로 초기에는 아무 메시지도 들어오지 않는다
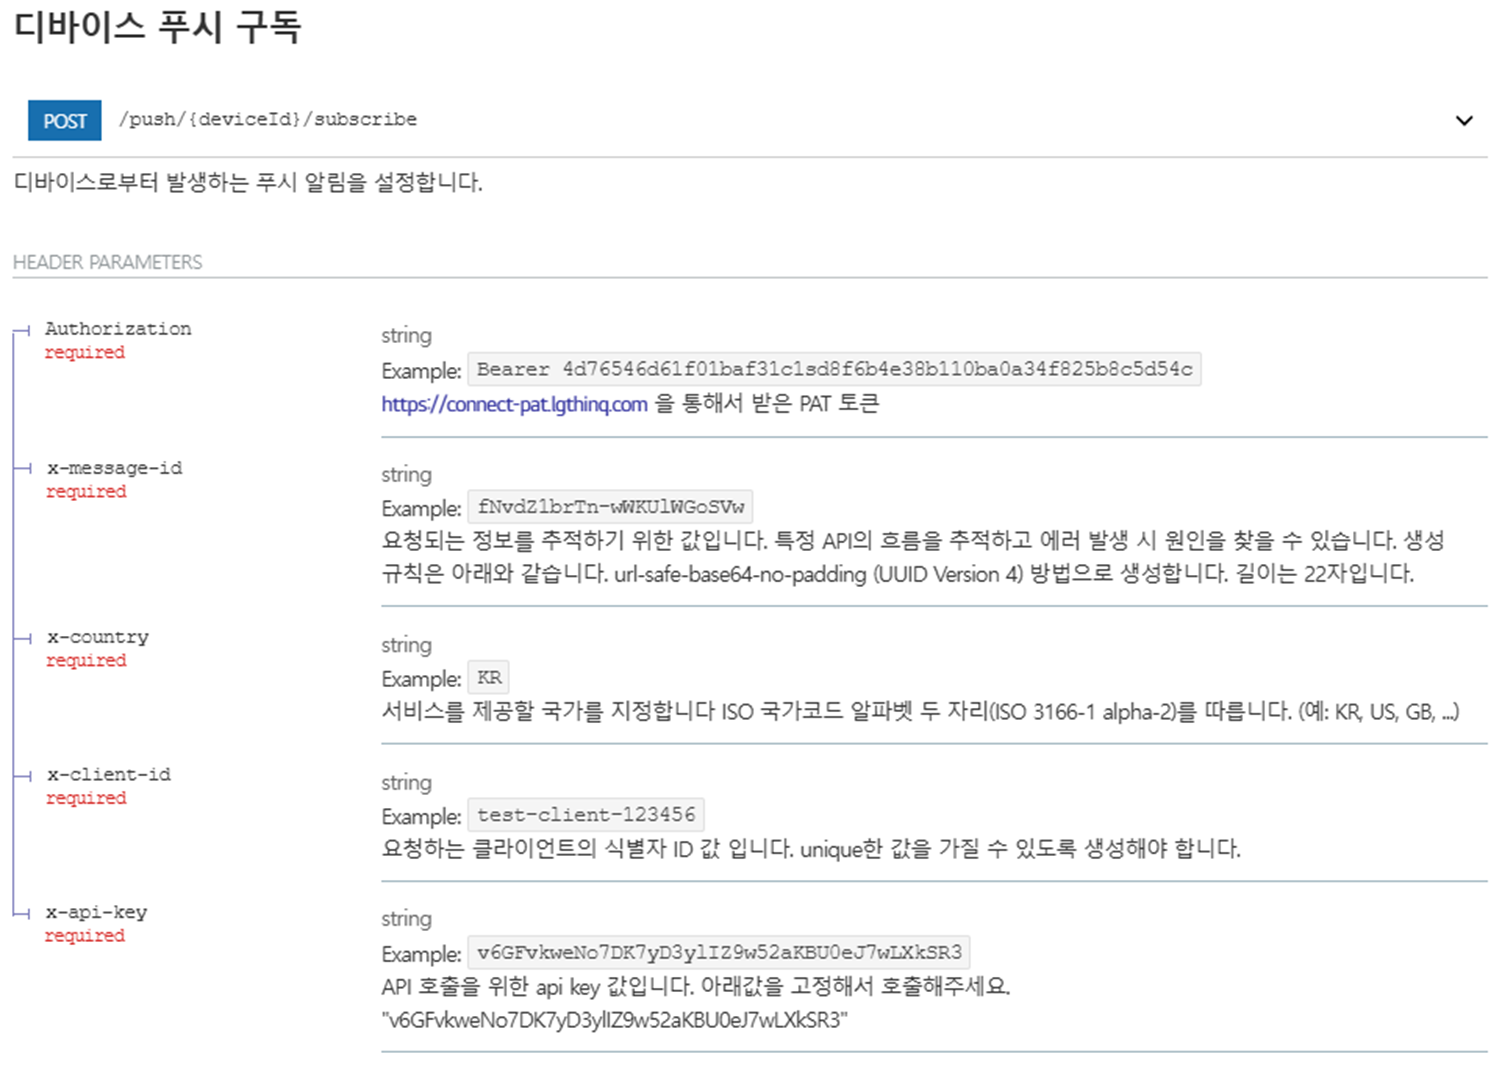
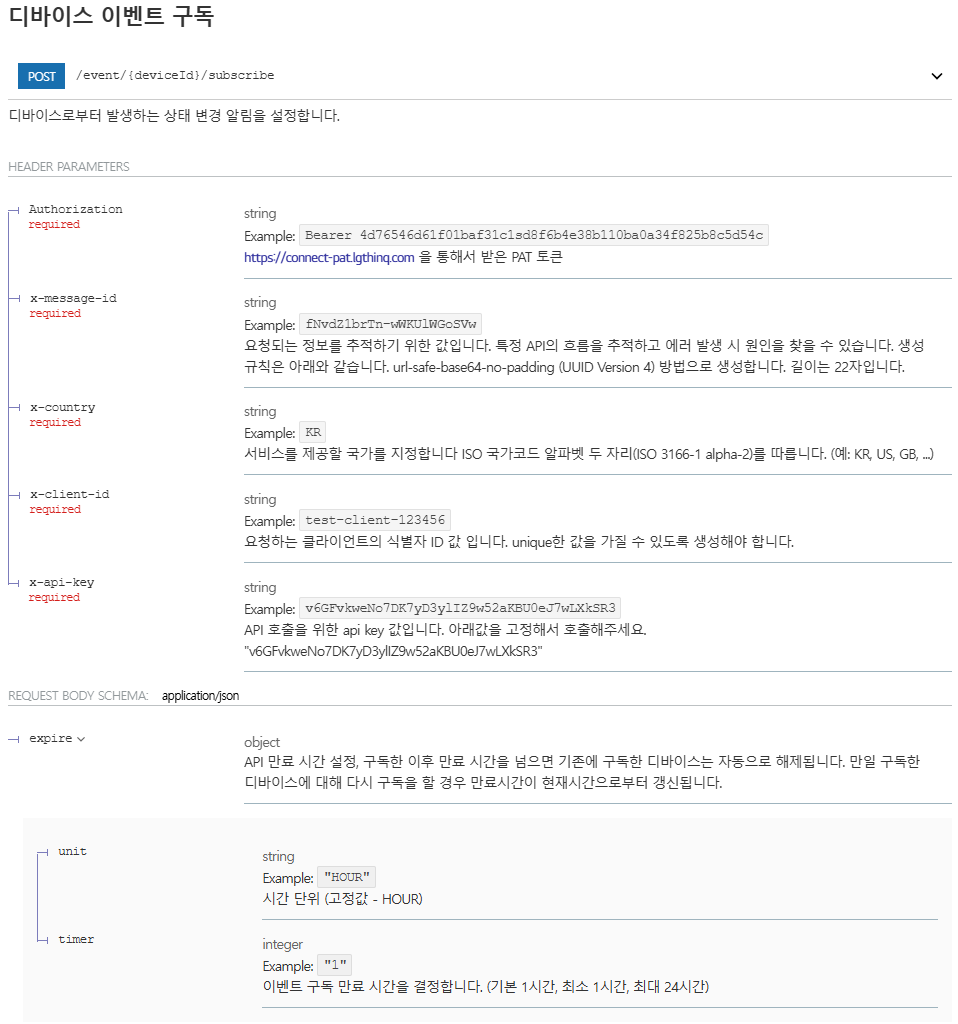
ThinQ API의 '디바이스 푸시 구독' 및 '디바이스 이벤트 구독' API를 호출(POST 메서드)해 특정 디바이스 ID에 대한 구독을 등록해야 MQTT 클라이언트로 메시지가 수신되는 구조이며, 디바이스 ID는 '디바이스 목록 조회' API를 호출해 쿼리할 수 있다
디바이스 리스트를 쿼리해 각각의 device_id를 알아낸 뒤, 그 중 하나의 디바이스의 푸시와 이벤트를 구독해보는 코드는 아래와 같다 (디바이스 종류는 M9 물걸레 로봇청소기)
※ response body에 별다른 정보는 없으므로 status_code가 200으로 정상 호출되었는지만 확인해주면 된다
def subscribe_device_push(device_id: str):
    url = base_url + f"/push/{device_id}/subscribe"
    headers = generate_request_header()
    res = requests.post(url, headers=headers)
    if not res.status_code == 200:
        raise ValueError(f"subscribe_device_push::Request Failed ({res.status_code}): {res.reason}, {res.text}")

def subscribe_device_event(device_id: str, expire_hour: int = 1):
    url = base_url + f"/event/{device_id}/subscribe"
    headers = generate_request_header()
    payload = {
        "expire": {
            "unit": "HOUR",
            "timer": max(1, min(24, expire_hour))
        }
    }
    res = requests.post(url, headers=headers, json=payload)
    if not res.status_code == 200:
        raise ValueError(f"subscribe_device_event::Request Failed ({res.status_code}): {res.reason}, {res.text}")
푸시 및 이벤트 구독은 아래와 같이 간단하게 호출할 수 있다
device_id = "xxxxxxxxxxxxxxxxxxxxxxxxxxxxxxxxxxxxxxxxxxxxxxxxxxxxxxxxxxxxxxx"
subscribe_device_push(device_id)
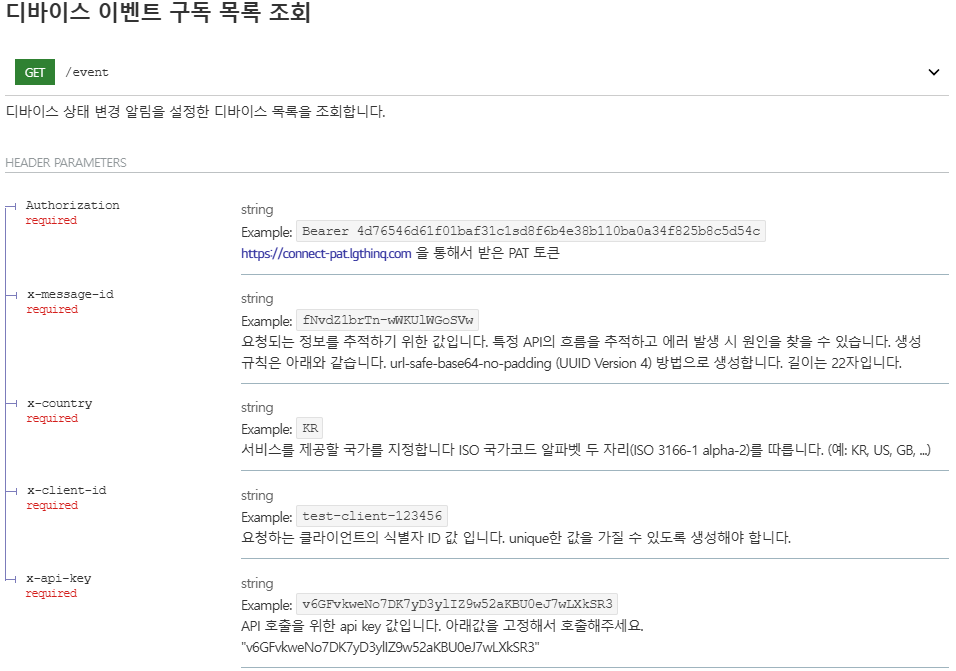
subscribe_device_event(device_id, 1)푸시와 이벤트 각각 구독중인 디바이스 리스트는 다음과 같이 쿼리할 수 있다 (GET 메서드)
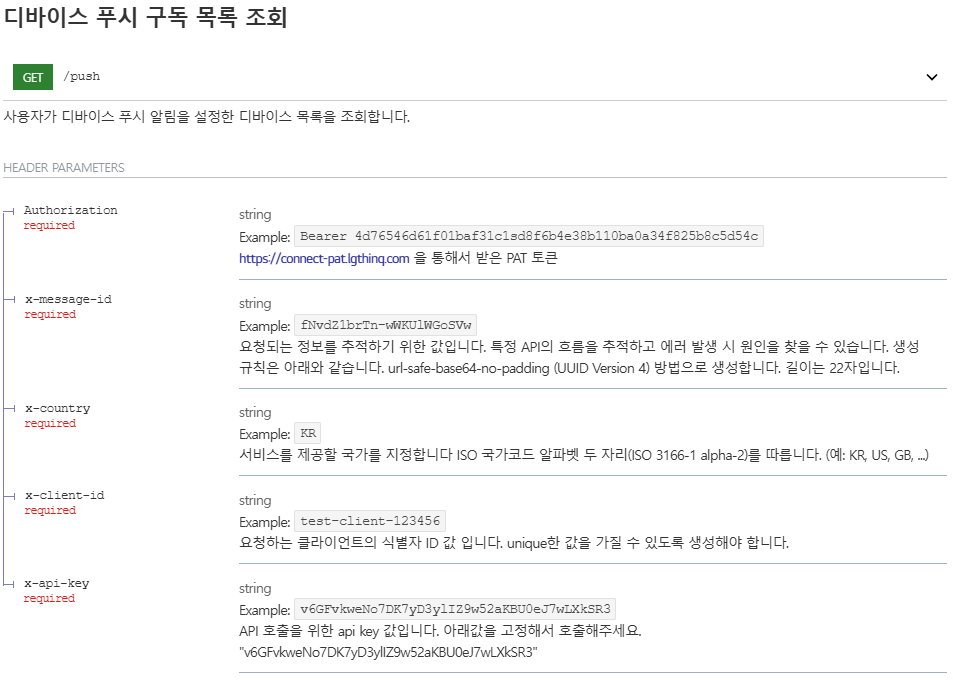
def query_device_push_subscription_list() -> list:
    url = base_url + "/push"
    headers = generate_request_header()
    res = requests.get(url, headers=headers)
    if not res.status_code == 200:
        raise ValueError(f"query_device_push_subscription_list::Request Failed ({res.status_code}): {res.reason}, {res.text}")
    obj = json.loads(res.content.decode())
    dev_id_list = list()
    for elem in obj.get('response'):
        dev_id_list.append(elem.get('deviceId'))
    return dev_id_list

def query_device_event_subscription_list() -> list:
    url = base_url + "/event"
    headers = generate_request_header()
    res = requests.get(url, headers=headers)
    if not res.status_code == 200:
        raise ValueError(f"query_device_event_subscription_list::Request Failed ({res.status_code}): {res.reason}, {res.text}")
    obj = json.loads(res.content.decode())
    dev_id_list = list()
    for elem in obj.get('response'):
        dev_id_list.append(elem.get('deviceId'))
    return dev_id_list
각각 호출해보면
print(query_device_push_subscription_list())
print(query_device_event_subscription_list())
푸시, 이벤트 각각 구독 등록한 로봇청소기의 device id가 리스트에 담겨 반환되는 것을 확인할 수 있다
이벤트의 경우 구독 API 호출 시 payload에 기입한 만료 시간(expire time)이 지나면 자동으로 구독이 해지되지만, 푸시의 경우 한 번 구독된 디바이스 ID의 경우 재구독하려 하면 404 Not Found 에러가 발생한다

따라서 어플리케이션 구현 시 디바이스의 푸시 혹은 이벤트는 적절하게 구독 및 구독 해지하는 시퀀스를 구현해주는 게 좋다
푸시와 이벤트 구독 해지는 아래와 같이 간단하게 구현할 수 있다 (DELETE 메서드)
def unsubscribe_device_push(device_id: str):
    url = base_url + f"/push/{device_id}/unsubscribe"
    headers = generate_request_header()
    res = requests.delete(url, headers=headers)
    if not res.status_code == 200:
        raise ValueError(f"unsubscribe_device_push::Request Failed ({res.status_code}): {res.reason}, {res.text}")

def unsubscribe_device_event(device_id: str):
    url = base_url + f"/event/{device_id}/unsubscribe"
    headers = generate_request_header()
    res = requests.delete(url, headers=headers)
    if not res.status_code == 200:
        raise ValueError(f"unsubscribe_device_event::Request Failed ({res.status_code}): {res.reason}, {res.text}")
4. MQTT 메시지 받아보기
로봇청소기는 디바이스 프로파일 스키마에 따르면 아래 6종류의 푸시를 받아볼 수 있다
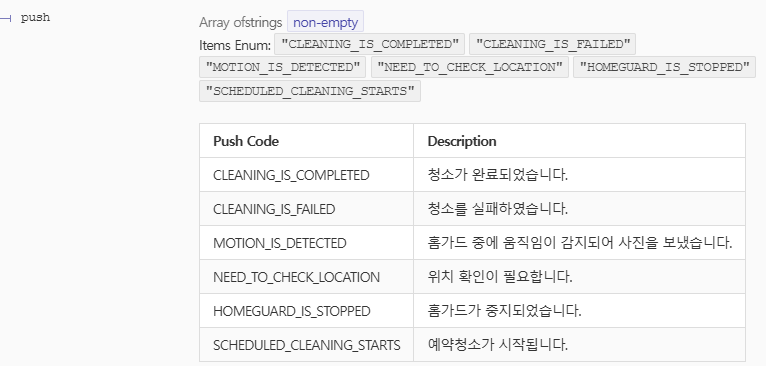
이 중 확인하기 쉬운 'HOMEGUARD_IS_STOPPED' 푸시를 받아보기 위해 MQTT 클라이언트의 on_message 콜백을 아래와 같이 수정한 뒤 ThinQ 모바일 앱을 통해 홈가드 실행 후 종료해봤다
def on_mqtt_client_message(client, userdata, message):
    print(message)
message는 paho.mqtt.client.MQTTMessage 객체로, 다음과 같이 파싱할 수 있다 (qos, mid 등 MQTT 프로토콜 관련 내용을 딱히 사용하지 않는다면 payload 멤버변수 하나만 바라봐도 된다)
# MQTTMessage 클래스 구현 원형
class MQTTMessage(object):
    """ This is a class that describes an incoming or outgoing message. It is
    passed to the on_message callback as the message parameter.

    Members:

    topic : String. topic that the message was published on.
    payload : Bytes/Byte array. the message payload.
    qos : Integer. The message Quality of Service 0, 1 or 2.
    retain : Boolean. If true, the message is a retained message and not fresh.
    mid : Integer. The message id.
    properties: Properties class. In MQTT v5.0, the properties associated with the message.
    """

    __slots__ = 'timestamp', 'state', 'dup', 'mid', '_topic', 'payload', 'qos', 'retain', 'info', 'properties'

    def __init__(self, mid=0, topic=b""):
        self.timestamp = 0
        self.state = mqtt_ms_invalid
        self.dup = False
        self.mid = mid
        self._topic = topic
        self.payload = b""
        self.qos = 0
        self.retain = False
        self.info = MQTTMessageInfo(mid)
def on_mqtt_client_message(client, userdata, message):
payload = message.payload.decode(encoding='utf-8')
print(payload)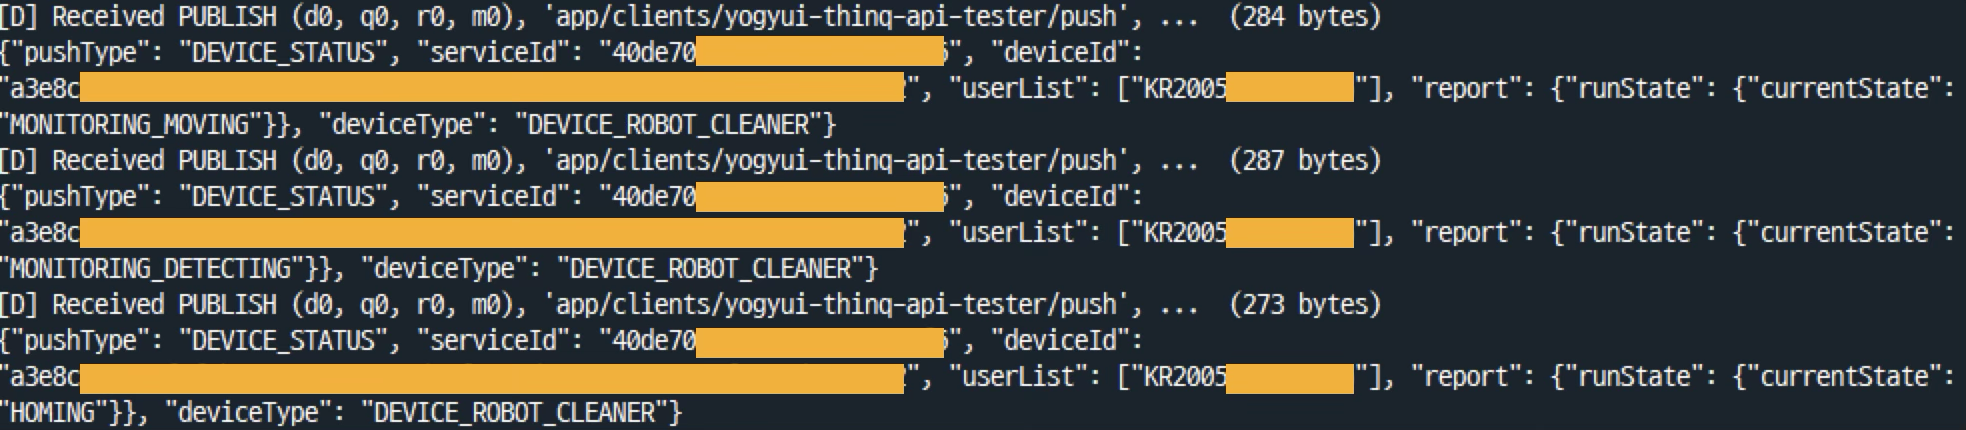
바이트 데이터 페이로드를 디코딩해보면 json 포맷의 딕셔너리 데이터가 문자열인 것을 알 수 있다
push 메시지의 페이로드 딕셔너리 구조는 다음과 같다 (아마 푸시 타입이나 디바이스 타입에 따라 내부 구조는 달라질 수 있을 것으로 추정됨)
┌ pushType
├ serviceId
├ deviceId
├ userList
└ report
└ runState
└ currentState
└ deviceType
디바이스 상태(DEVICE_STATUS)가 바뀜에 따라 MQTT 메시지가 수신되므로 이에 따라 적절하게 처리하는 구문을 어플리케이션 레벨에서 구현해주면 된다
def on_mqtt_client_message(client, userdata, message):
    payload = message.payload.decode(encoding='utf-8')
    obj = json.loads(payload)
    pushType = obj.get('pushType')
    deviceId = obj.get('deviceId')
    report = obj.get('report')
    runState = report.get('runState')
    deviceType = report.get('deviceType')
    # TODO: 적절한 처리
이제 LG 스마트솔루션 API를 통해 ThinQ 플랫폼에 등록된 내 기기들의 고유 아이디를 얻고, 이를 이용해 푸시, 이벤트 발생 시 MQTT 클라이언트로 메시지를 수신할 수 있게 되었다
이 후 글에서는 몇 가지 디바이스 종류(공기청정기, 로봇청소기 등)들을 API를 통해 현재 상태를 확인하고 상태를 변경(제어)하는 방법에 대한 예시를 다뤄볼 예정이다

'홈네트워크(IoT) > 일반' 카테고리의 다른 글
| LG ThinQ 스마트솔루션 API: AWS IoT MQTT Broker (1) (2) | 2025.01.16 |
|---|---|
| LG ThinQ(씽큐) 플랫폼 API 공개 및 OpenAPI 사용해보기 (스마트솔루션 API) (5) | 2024.12.30 |
| Let's Encrypt(certbot) - bad marshal data 오류 해결 방법 (1) | 2024.09.19 |
| Home Assistant 애드온 컨테이너 내부에서 애드온 옵션 변경하기 (bashio) (0) | 2024.03.20 |
| Home Assistant add-on 베타버전 릴리즈 (25) | 2024.03.20 |


